0

Amy’s Birthday Hats!

I made these wacky little hats for a quicky birthday party 
celebration for one of my best girls the other night. 
Here is a verrrrrrrry dumbed-down version of a tutorial on how to make them.

 1.  Go to your local frozen yogurt and/or ice-cream store and embarrassingly ask them for 5 empty containers and one mini container.

2.  Hastily cover each ice-cream dish in the fabric of your choosing.

I glued mine on using a hot glue gun as I do with almost everything in my life.  It’s not completely necessary to make this beautiful, obviously, just get the fabric on there.

 3. Here’s where the “very dumbed-down” portion of this tutorial really shines through:

Hot glue some feathers on the top and add some googly eyes.   (See what I mean?)

It’s also a good idea to glue a string to either side of the hat (on the inside) to serve as a method to tie the hat to your head.

Which brings us to Step 4!….

4. Tie the hat to your head and you’re done!

Now go to the party and wow your friends with your craftiness!

Don’t forget the mini hat for your kitten!!  

Have so much fun at your wacky hat party!
0

Lace Stencil Tutorial

 As promised, here is the lace stencil tutorial from a painting I made last week.  It’s a super easy way to make it look like you really put a lot of time into a project without having to, ya know, really put a lot of time into a project.

Step 1:
To begin this project, gather your supplies:

– I used another painting I had started that was turning out rather lackluster and needed some Umf!  You could also use a blank canvas, some old wood, a frame that needs a makeover, your shoes, anything really.
-tape
– a piece of lace
-some spray paint
-a well ventilated work area

 The rest of this tutorial is after the jump:

Step 2:
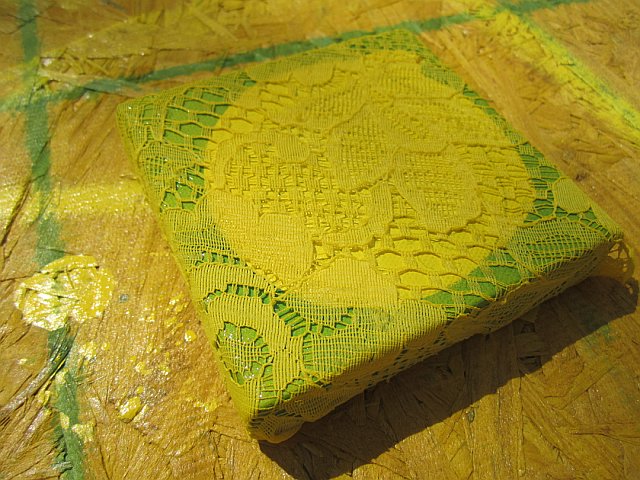
Cover lackluster painting with the piece of lace.

Step 3: 
Fold piece around painting like you’re wrapping a present.

Tape ends down…this doesn’t have to be pretty but make sure the lace is pulled taut so that it stays put.

Step 4:
Look at what a great job you did covering the canvas in lace.

Consider leaving it just how it is cause it’s actually kinda cute but then come to your senses and move on to Step 5.

Step 5:
Lightly spray paint the entire thing a delicious shade of Sun Yellow!

It doesn’t really have to be yellow.  Just try to pick a color that will stand out against the lackluster painting you didn’t really like in the first place.

Allow the paint to dry for at least 30 minutes.

 Step 6:
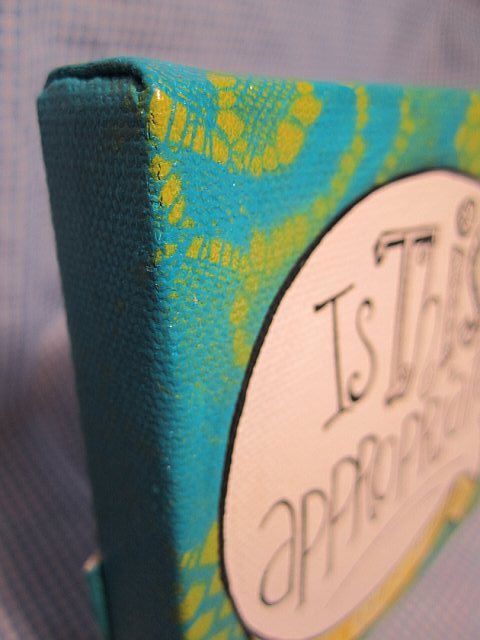
Take off the lace and Viola!!  Precious!

Step 7:
Finish up whatever painting it is that you’re doing.

For me, it meant painting over some of the most detialed parts of the lace design but I knew it was for a good cause so I did it.

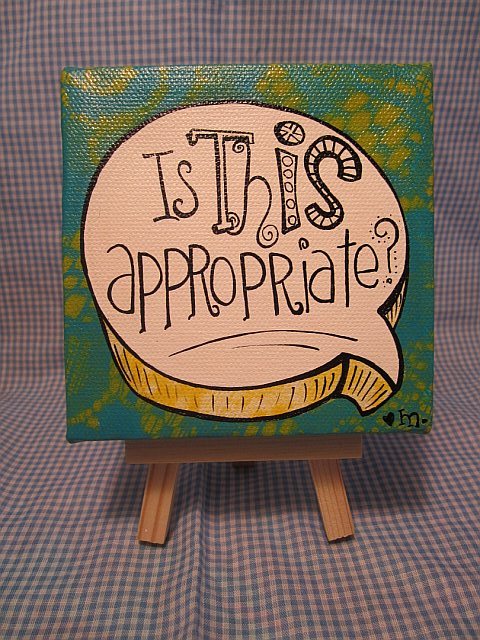
I painted my bubble to say, “Is This Appropriate?” which can be explained in a previous post.

And you’re done!!  
Now give the painting to your friend and revel in the Ooo’s and 
Ahhh’s as they’re bound to be so impressed with your craftiness!!
0

Is this appropriate?

Custom speech bubble made for my pattern loving housemate.
See, my housemate, Liv, is a first year art teacher and dressing for the classroom is new to her.  Because of that, once a morning, every morning she comes to my doorway dressed in her newest creation and asks me the question, “Is this appropriate?”
The funny thing is that I’m not exactly a tweed-pants-owning, beige-cardigan wearer either.  It’s basically the blind leading the blind in my house.  We seem to be making due though…neither of us have been pink slipped yet!!  (Knock on wood!)
The design on this guy was created by covering the canvas in lace and spray painting over it.  Tutorial to follow.
You look great today!
0

The Name Game

Custom name plaques are always a big hit at baby shower’s and birthday parties and these two were no exception.  This double canvas set was painted for a little girl who’s named but not yet born.  I left some space under her name for the birth date, weight and height.

I love this bunnies and had a great time painting them.  I only wish I could take credit for the characters…

but I can’t.  The bedding that the paintings are themed after is available here

Here’s another name plaque I painted recently.  This one for a boy’s room but also painted to coordinate with the bedding set.

I really want to make a “this one was a slam dunk!” comment here but I’m going to resist. 

The inspiration for this painting can be seen here
Let me know if you need your own name plaque painted for someone special coming into your life!!