
It’s National Popcorn Day today! Deeeeelicious!
Monthly Archives: January 2012
Our Super 8 Wedding
My husband and I just passed the 8-month mark on gettin’ hitched. Ya us! Now the only thing we talk about is saving for a house and buying a house and what kind of house to buy and what houses go for in this neighborhood and maybe we should build a house…notice a theme?
So it was a much needed breath of fresh air to receive this video of our wedding as a gift from our friend Chad last week. Chad lives in NYC and currently works as an assistant editor for the TV show “Parking Wars”. (He also works on Dog: Bounty Hunter- a fact a find hilariously awesome.) He’s a husband, a cat lover, an avid D.I.Y.er & an incredibly genuine human being who made this f*#@ing amazing video for us in his “spare” time. (Oh, and he skates, you can see him shred (and fall down a little) in some of his other videos.)
It was so special to receive this little 2 minute reminder of why we got married in the first place. It immediately took us back to our wedding day. So now, when I want to strangle my sweet sweet husband for making me talk about mortgages, I’ll just take a break, watch this video and hold off for tomorrow.
Thanks Chad! ❤ ❤
*Here’s the direct link to the video in case that doesn’t play: http://vimeo.com/35004644*
Gritsy needs a forever home
By now anyone who knows me probably knows that I have a cat living on my porch; but, what you don’t know is how sweet the cat that lives on my porch is- she’s way more cuddly than the little jerks that live inside the house! I really want to bring her in and spoil her rotten so for the last 3 1/2 months I’ve tried every day to acclimate my current cats to Gritsy’s smell and every single day when I come in smelling like her, my boy cat hisses and attacks my Mama Cat. I’ve invested in Feliway, tried holistic cat aromatherapy, let them smell each other between the doors….nothing has worked to make my boy cat not want to rip apart and eat the cat on my porch. And, because I have a cat living on my porch, I can’t even let my cats outside to play in this unseasonably warm weather.
Basically what I’m saying is, though I really don’t want to, I need to find Gritsy a home, not on my porch, where she can be safe and happy and loved.

Please adopt me:
Grits
Spayed Female, 3 years old
Grey/Brown Tabby Cat

If you live in/around Boston/Somerville and you’re interested
in adopting Grits, email me and I’ll give you more information.
Thanks for looking! Please pass this on!! ~mandee rae
Heart Shaped Love: A Valentine Marshmallow Tutorial

What better way to tell your little ones you love them this Valentine’s Day than with these homemade heart-shaped marshmallows? Making marshmallows from scratch was way less difficult than I thought it was going to be. They can easily be prepared in under 30 minutes.
Step 1 To make marshmallows go over to Elizabeth LaBau’s wonderful about.com marshmallow photo tutorial and follow the steps on Pages 1-6. Then, for Step 7 come back and see me. (Trust me, this is going to be much easier than trying to follow my directions.)
Step 7 Pour half of your marshmallow mixture onto half of your prepared baking sheet (we didn’t use tinfoil cause we’re rule breakers) and spread using a rubber spatula.
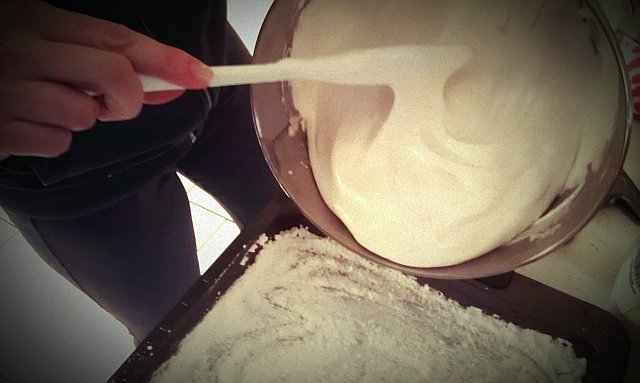
Step 8 Put a few drops of pink food coloring into the remaining half of the mixture and stir until it is a uniform pink.


Step 9 Pour the remaining mixture onto the other half of the sheet and spread out using a spatula.

OPTIONAL
Step 10 Coat marshmallow mixture with sprinkles!
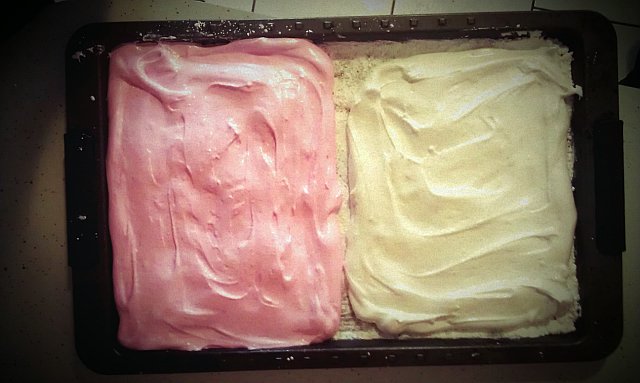
Step 11 The recipe calls for the marshmallows to “sit out for several hours or overnight to fully set up.” However, because we are horribly impatient and wanted to eat marshmallows NOW we just set ours outside in the snow for about a half an hour and they were fine.
Step 12 Using heart shaped cookie cutters (metal ones with sharp edges work best) begin cutting out your heart shapes.

hand modeling by Liz.


hand modeling by Liv.
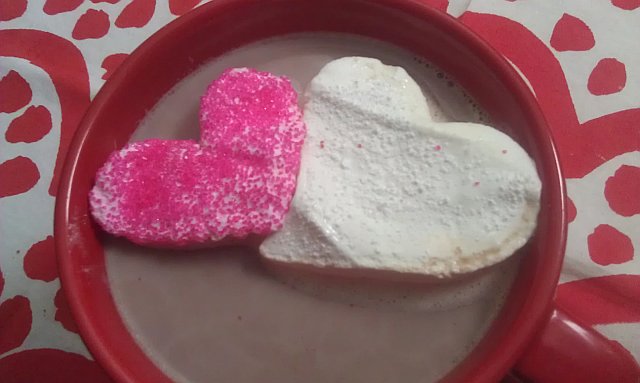
Repeat until there are no more hearts to be cut out and you’re left with a delicous pile of marshmallow remnants.


Step 13 Make some hot chocolate, plop in a couple of marshmallows and make somebody’s day!


Happy Year of the Fat Dragon Baby

My friend Kristen (of such internet notoriety as Kristen the Christmas Diorama & Kristen and the Wedding Tchotchkis) made a dragon costume (and flame on a stick! what!) for her friends very “healthy” (read: chunky muffin) baby and then convinced her co-workers to pose for this picture just so that she could wish all of us a very
Happy & Healthy Chinese New Year!
(And also because dressing babies up as animals is awesome.) Thanks Kristen!
Happy National Squirrel Appreciation Day!!

Put a Squirrel on It.
Fluffernutter, party of two.

If you’ve never had a fluffernutter than this window painting might make no sense to you but I’ll take my chances because here in New England the very mention of Fluff -made right here in Everett, MA- sparks childhood memories that people can’t help but share…whether you like it or not.

Being from the West Coast I had never heard of a Fluff, let alone a Fluffernutter, until I moved to Boston about 10 years ago. You’d have thought I’d told people I had never heard of shoes the way they would look at me when I didn’t know what a “fluffernutter” was. They were outraged at my Fluff-less childhood.
And now I know why! Fluff and peanut butter were made to be together. They’re the yin and yang of sandwich components. And so versatile! You can have a Fluffernutter for lunch, eat one as a snack or even have one for dessert. Can balogna and cheese do that?


If you’ve never had a Fluffernutter go make one right now. They’re delicious. And if you can’t buy Fluff (not Kraft Marshmallow Cream, mind you, there’s a difference) in your ‘hood then use this handy Fluff-Finder feature to hunt down the closest seller. And if that doesn’t work, you can get a case delivered right to your door. May your children never have to go Fluffernutter-less.
For more Fluff related goodness, go to the Union Square Main Street website and check out pictures from their annual ‘What the Fluff?” festival.
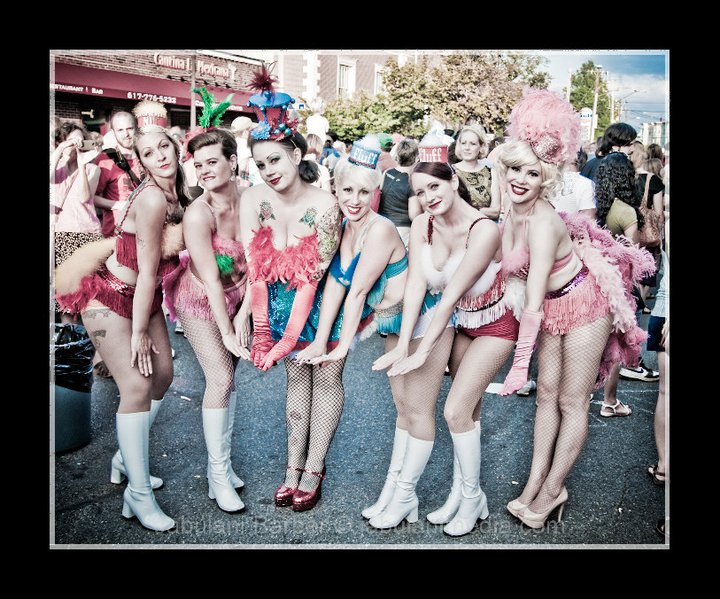 Photo credit Jabulani Barber
|
Pop-Up-Heart Trader Joe’s Valentine Card

I made this Valentine for a friend of mine who tragically *dramatic pause* lives in a Trader Joe-less part of the country. **Cue inspirational music** A part of our great nation where grocers don’t wear Hawaiian shirts and two-buck-chuck is a story heard only in fairy tales. I hope to, within my lifetime, see a world where everyone can get fat free black bean dip and Orangeboom regardless of their geographical location! Where Oklahoma and Arkansas can share not just a border, but a love for free samples! Can I get an amen?!
For this project you will need:

-
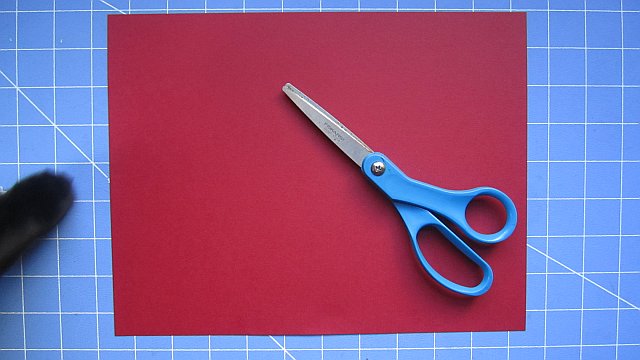
one piece of red 8.5×11″ cardstock
-
one Trader Joe’s bag
-
scissors
-
a glue stick
-
a sharpie
-
a cat butt (optional)
Step 1: Start out by laying your cardstock on your cut proof mat. For quality control purposes your cat should immediatly come sit on whatever it is you’re doing and act like she doesn’t see you. Once you’ve passed this rigurous inspection process move on to Step 2.

Step 2: Fold paper in half (use handle of scissors to create a nice crease) and cut along fold.


Step 3: Fold both halves in half again to create a card shape.

Step 4: With paper folded in half, draw the outline of 2 hearts on one of the pieces of paper. The outer heart should leave a space at the farthest edge connected to the paper. Leave about 1/2″ connected.

Cut outer heart (leaving 1/2″ connector!) and fold back.

Then cut the inner heart out entirely.

Leaving you with this cute pop-out-heart card.

Step 5: Cut the side out of a T.J.’s bag (this is technically upcycling) and place your card over it to frame your image.
(I decided on the wine bottle with a trace of the “traderjoes.com” visable just in case my recipient a. doesn’t realize what the background is or b. doesn’t check my blog. In either case, she’s kind of a jerk.)


Step 6. Now, glue the background to the back of the card, making sure not to glue down the heart or else it won’t pop-up anymore.

Add the other half of the cardstock to the back of the card to make it pretty.

Write your message and you’re done!

One of the great things about this card is that it makes you seem sweet, wanting to share a little piece of Trader Joe’s with someone less fortunate but in reality you’re kinda just rubbing it in their face. Awww, I love friendship. Happy crafting!
Make Me: PDQ Veggie Pot Pie
Why Don’t You Make Me:
PDQ Veggie Pot Pie

It’s a cold, dreary day in Boston today. A day that makes you want to slip into some sweatpants, get under a blanket and watch 12-13 hours of daytime TV. A perfect day for comfort food and I have just the thing, this hearty, meat-free pot pie that takes about 15 minutes to prepare and is muy delicioso!
Ingredients
- 2 frozen pie crusts
- frozen mixed veggies
- Quorn veggie “chick’n” patties
- 1/2 an onion
- mushroom gravy
- salt n peppa
- Goya season salt
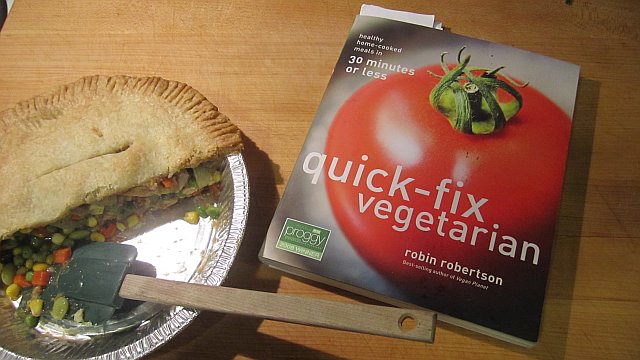
I got this recipe from my Quick Fix Vegetarian cookbook which is chock full of healthy vegetarian meals that can be ready in under 30 minutes. In the book this recipe is made in a casserole dish with a pie crust over the top. The crust is my favorite part of a pot pie so the crust-to-filler ratio isn’t high enough for me that way so I decided to make my pot pie in one pie crust and cover it with a second crust to make a full pie.
Either way is fine. (My way just happens to be better is all.)
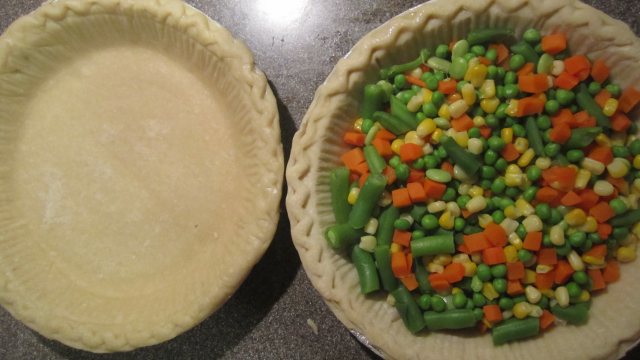
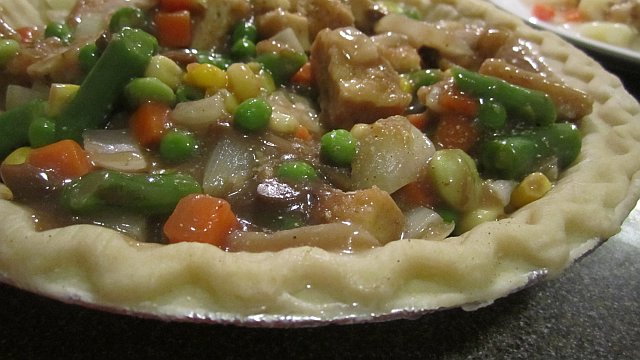
To begin, cook your frozen veggies and add them to one of your frozen pie shells. Leave the 2nd pie crust out to allow it to thaw.

Cut and saute 1/2 an onion, add to veggies.

Add “meat”- I used 2 frozen “chik’n” patties from Quorn, microwaved, cut into cubes and added to my dish.
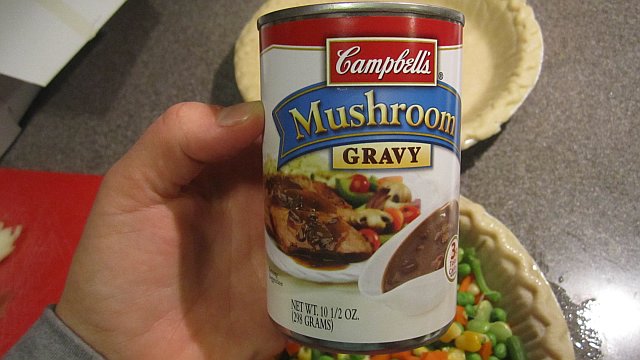
Cover with gravy (1 can), salt & pepper to taste, add Goya season salt if you want and gently fold all ingredients together.
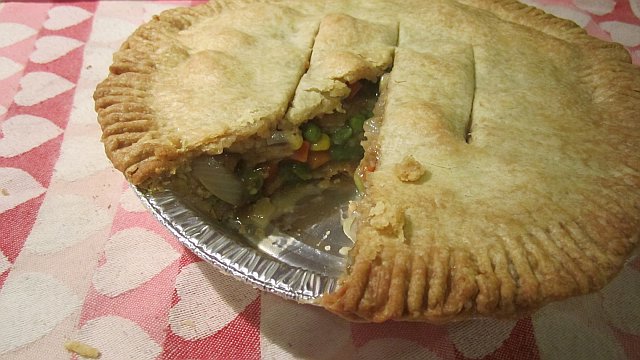
Next, gently peel your now unfrozen 2nd pie crust from the pan and place it on top of the pie. Press sides together with a fork and cut 3 vents in the top to allow steam to escape.

Pop it in your preheated 350 degree oven -on top of a cookie sheet to catch any overflow- and bake for about 45 minutes or until golden brown and bubbly.


I’ve never used a store-bought pie crust (God’s honest truth) but they’ve made a believer out of me. They were flaky, baked up to a perfect golden brown and tasted wonderful.
I shared this pot pie with my non-vegetarian husband and meat eating friend Stephen and were given rave reviews by both! It’s so hearty and tasty that unless you tell people it’s they probably won’t even know it’s a vegetarian dish.
So go on, why don’t you make me?
Why Don’t You Make Me?: Block Printed Valentine’s Card

This Valetine’s Day, spread some love (that won’t result in a rash) by making this handcarved, handprinted, hand-addressed, snail mailed Valetine for your Sweetie.
For this project you will need:
-
pencil/eraser
-
a brayer (or a paint roller)
-
a scrap piece of cardboard
-
a spoon
-
cardstock or thin cardboard to print on
-
a stamp
To begin, draw your image directly onto the carving block using a pencil with a slightly rounded tip. *If the tip is too sharp it will puncture the surface and not mark properly.* If you’ve chosen to do words, keep in mind that you will need to write the words backwards onto your carving block. Luckily for me, writing backwards is my secret super power.

(I’m the first to admit this is not a terribly useful super power but it’s the only one I’ve got so please try to act impressed.)

When you’re satisfied with your design, begin to carve out the area around your letters using your carving tool.

Continue to carve until you’re happy with your image.

Next, prepare your brayer. I don’t have a brayer so I used this small paint roller that I have. Using some cardboard as your surface add some acrylic paint and roll it until your roller/brayer is evenly covered.

Then roll the paint onto your carved block until it is also evenly covered.

Now, rather than picking up your block and trying to set it down on your printing surface, bring your printing surface to your block.

Lay the paper down on top of the freshly inked surface and using the backside of a spoon, rub the back of the paper to burnish the image onto the paper.
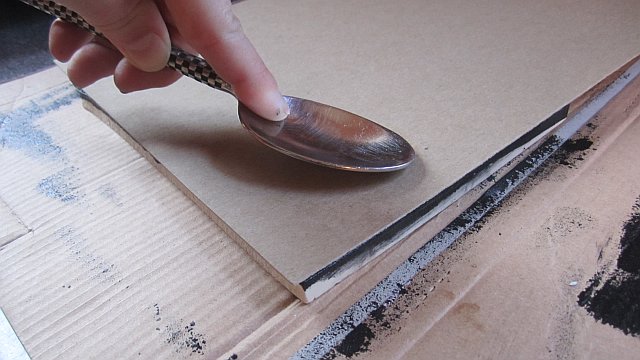
(Thanks for teaching me that trick (and word) Atara!)

Remove paper and there you have it!

For an added touch, add glue to the heart,

and coat in Glitter, obviously.

When the paint & glue is dried, turn over and address your post card to the lucky recipient of your choice, add a stamp (it may cost slightly more than a regular post-card stamp, check with the post office) and drop it in the mailbox. **

There is nothing more special that recieving something handmade from someone who loves you…except for recieving money maybe but I don’t know how to make that.
Happy Valentine’s Day!
**If you don’t have a Valentine my co-worker Zach said you can just send the card to him, because he’s a giver.

* * * * * * * * * * * * * * * * * *
Inspiration for this project came from Jennifer’s amazing Christmas card:

Thanks Jennifer!
