0

Winter Window Season

Winter window season is in full swing around these parts.  
Here are some of the Winter shenanigans going on in Somerville!

…over at Treeline:

And down at Petsi Pies:

And a quick Frosty at little Tayla’s house!

Off to paint more windows now.  Contact me if you’d like one of your own!
0

It’s beginning to look a lot like Christmas…CRAFTING!

It snowed the other morning.

For me that means it’s Christmas time.

So even though it only snowed for 3 minutes and it was mixed with rain and none of it stuck to the ground…it still snowed. And now it’s Christmas time!!!

More specifically, it’s Christmas CRAFTING time!!  Here are some of my favorite Christmas crafts from years past to keep you busy while I stretch out my glitter coating, wreath making, snowflake cutting muscles. It’s important to ease into these things lest you pull something and have to sit out the rest of the season.

 
           D.I.Y. FIREPLACE         UGLY CHRISTMAS SWEATER

I’d love to see any projects you make following my tutorials or any projects you’ve made on your own!  

Merry Christmas Crafting season!!
0

Sadie the Incredible Mermaid Girl: D.I.Y. Traveling Side Show Mermaid Baby Costume

This year was my baby girl’s first halloween as a dress-up-able-human and it was imperative that she have the perfect first Halloween costume.  I had originally had my heart set on her being the bearded lady in a side show but when she wouldn’t leave the beard on I decided to take advantage of the fact that she’s not walking yet and put her in some sort of a sack costume which also meant that I would need to decorate her stroller…which naturally led me to make her the Incredible Mermaid Girl in a traveling side show!

I created her stroller cover using foam core as the fish tank frame; blue fabric, glitter tulle & clear plastic Christmas ornaments for the water; and foam core for the signage & held it all together using a glue gun.  I attached the whole contraption to the stroller (a Britax B-agile) using Velcro Garland Tie and all that was missing was a fat little mermaid to go inside.

Enter one fat little mermaid.  

I have a tutorial on how to make the shell top for the costume here 
& the mermaid tail tutorial is in the works!  
I’d love to see pictures of your home-made Halloween costumes.  Happy Be-lated Halloween!!
Christmas here we come!!!!!!!!!!!!!!!!!!
0

Last Minute NO-SEW D.I.Y. Costume: Mini Hula Girl

Here’s a last minute NO-SEW costume idea for you or your little one: 

What you’ll need
  • a green plastic tablecloth
  • scissors
  • glue gun/glue sticks
  • string/rope/twine
  • fringe (optional)
  • hawaiian flower for hair clip (optional)
  • shirt or onesie
  • felt for shells
  • blue marker

1. Open your tablecloth and cut it down to fit lengthwise around your waist and so that it’s long enough to just graze the knee.  
2. Keep it folded over and begin cutting it into fringe.

3. Once the fringe is cut grab your rope and fringe if you have some laying around.  I had this awesome piece of white fringe/tassles leftover from an old project.

4. Hot glue your twine onto the skirt at the fold and let dry.  Flip skirt over- hot glue the fringe to the front.
Your skirt is done.

Now for the shirt.

I’m using this off-white onesie for my daughter’s costume.  It has a design on it but it should be covered by the shells so don’t worry about it.  I’m also using left-over felt from her mermaid costume to be green and save a buck.

  1. Lay the felt scraps over the design to figure out where the shells will go.  Draw the shells directly onto the felt.
2. Cut out the shells and define them using any permanent marker.  I like this blue but you can use any color.  

3. Hot glue the shells onto the shirt.

Aaaaaand you’re done!

Now slip the costume onto your little model and try desperately to get her to look at you.  
Good luck and HAPPY HALLOWEEN!!!

0

It’s here! It’s here! It’s FLUFF FEST!!

Today is Fluff Fest in Union Square and I am bursting at the seams with excitement!  If you have been anywhere near me for the last month or so I’ve probably already told you that I am the Official 2013 Fluff Festival Sign Painter!!  (A title I gave myself)  I’ve been working dilligantly for weeks now trying to get all 23 signs and 5 trophies done and I can’t wait to see them in action at the festival!

Fluff Fest was started in 2005 by Mimi Graney who is the Head Lady in Charge (also I title I created) over at Union Square Main Streets.  She is in charge of all things Union-Square from craft shows to farmer’s markets and everything in between.  This is the 8th year of the Fluff Fest and they are anticipated THOUSANDS of attendees!!

…Which means of course that THOUSANDS of people are going to see my signs!!!  I can’t wait.  It starts at 3pm and goes to 7:00 there are games and performances and a cooking contest and of course PRIZES!!

Maybe I’ll see you there.  I’ll be the one taking selfies with all of the signs. 🙂

Happy Fluff Fest!!!

You can see pictures of all of my little babies at my gallery page: mandeemade.shutterfly.com and you can learn more about Fluff Fest at the Union Square Main Streets website.

0

I joined a sorority!

Ok, maybe I didn’t actually join a sorority BUT I did paint some FOUR FOOT TALL lawn letters for one!  The super nice ladies of Ioma Gamma Upsilon at U-Mass Amherst contacted me to customize their new letters and I couldn’t wait.  It’s probably the most unique (read: weirdest) request I’ve had to date so I was obviously all about it.
  
Ioma Gamma Upsilon’s colors are ultramarine & green and they wanted an all-over floral print on the letters.  I created a custom light teal color for the background and then did a simple white, blue & green design over the entire surface.   I also sealed the letters with a matte clear coat so that they wouldn’t have a glare during photo shoots but would be resistant to beer-bong mishaps.  (Or is that just in fraternities?  …Either way.)    
Now, before you tell me how great my all-over design is, because I can tell you’re dying to…I have a confession…this is actually my best-friend Liz’s design.  It’s what happens when she’s distracted and doodling.  These awesome little flowers and swirls just pour out of her pen…and then I snatch them up and make them life size on huge letters.  That’s what friends are for, right??  Thanks Liz!!

Sadie’s all ready to pledge.  Get this girl a paddle!

1

Custom Artwork with a Paisley Print

 These paisley paintings were done for a little lady’s room inspired by the lampshade her Mom bought  at PBK from the Tera Paisley Collection.

All of the designs mimic the style of the fabric but are completely original to match the overall color-scheme of bright pinks, purples, greens and blues in her room.

Because there is no discernible top or bottom, left or right, they can be hung in any order and any direction.  They can be hung separately, one on each wall, in a row, in a grid, in a circle, on the ceiling…whatever her little heart desires.  
This one kind of looks like some sort of weird amoeba.  I’m ok with that. 

Contact me if you’d like some custom paintings for your own little one.  Thanks for stopping by!
3

Dresser Makeover: Recreating a $799 dresser for $42

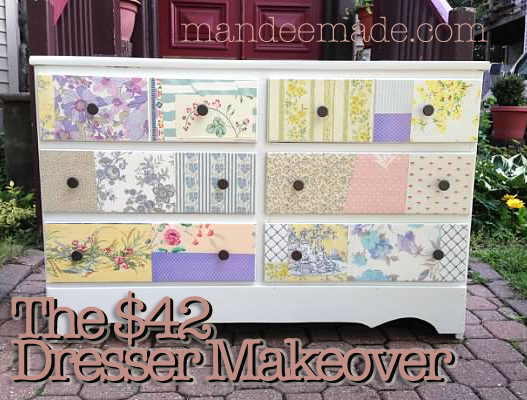
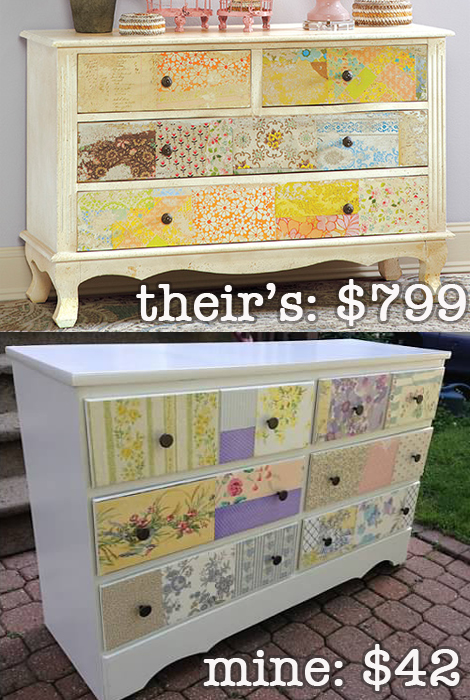
Recently I was approached to recreate a beautiful dresser with a staggering price tag.  The Collage Dresser retails for $799 and I’m sure it’s well worth it- the dresser is lovely- but “in this economy” (aka the catch phrase of the 21st century) who can really afford it?  The recipient also wanted a decidedly less “shabby chic” version of the dresser with no distressing or faux wear on the paper.

To make this dresser I started out with my basic supplies.  My client already had an old cheap dresser in her house so we saved money on having to buy one though you can always find cheap dressers on Craigslist if you were looking to do this project.   Cost of project: $0.00
I also had some semi-gloss, oil-based white paint left over from another project and used that to paint the dresser.  It’s a good idea to use a gloss or semi-gloss on dressers so that you can wipe them down if necessary.  I did 3 coats of the white with a roller.  So far the cost of this project is still $0.00.  Excellent.
I ordered some vintage wallpaper on Etsy from 2 shops, Vintage Sheet Addict and Threads & Memories, I spent about $16 at each shop and the paper is awesome.  There were so many cool designs it was really hard to decide which ones made the cut.  Cost of project now: $32.
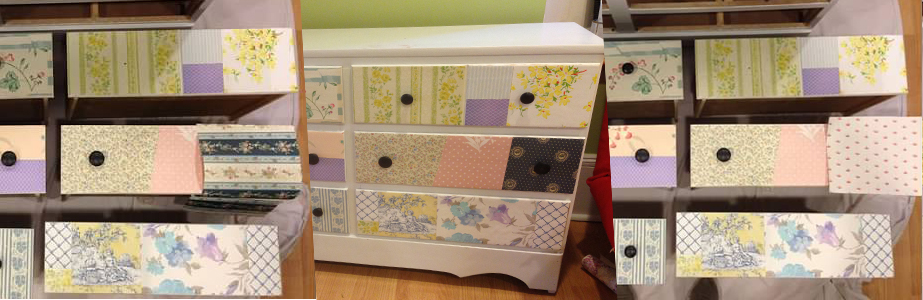
I laid the paper out on the drawers and experimented with placement until it looked right. 
One drawer in particular gave me a considerable amount of trouble.   I got it right on the 3rd attempt. 
I glued the wallpaper in place using Tacky Glue and then smoothed it out using a brayer.  (You can find them both at Michael’s, AC Moore, Blick, etc.)  This worked better than Modge Podge because since this is vintage wallpaper that’s been rolled up for God knows how long- it didn’t lay as well as regular paper would and the corners kept curling up on me.  Because the Tacky Glue is true to it’s name and “tacky”, it was easier to make the edges stick to the drawer.   

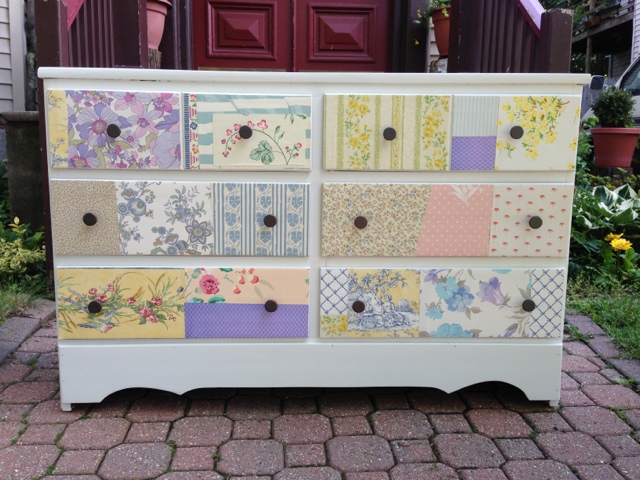
Then I spent $10 on some basic black knobs from the Target General Super Store and my dresser was complete.  Bringing my grand total to $42 and some change.  Not bad considering this project was done as a trade- I got to spend a week at my client’s house on Cape Cod in exchange for creating this dresser for her.  I think I got the better end of this bargain.

Thanks for coming by!  I hope you liked my project.  If you did, let me know in the comments below and don’t forget to go “like” me on Facebook.   (I told my Mom I was popular…I don’t want to disappoint her.)
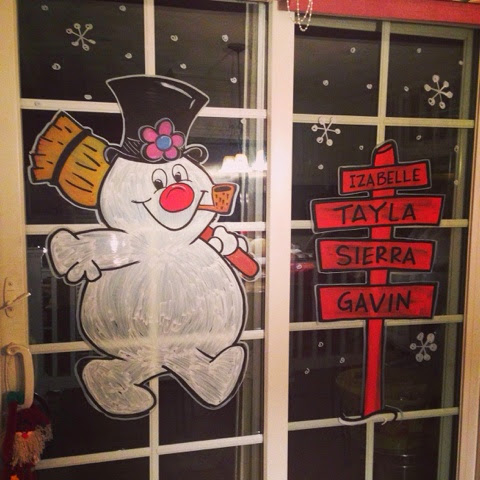