0

It’s beginning to look a lot like Christmas…CRAFTING!

It snowed the other morning.

For me that means it’s Christmas time.

So even though it only snowed for 3 minutes and it was mixed with rain and none of it stuck to the ground…it still snowed. And now it’s Christmas time!!!

More specifically, it’s Christmas CRAFTING time!!  Here are some of my favorite Christmas crafts from years past to keep you busy while I stretch out my glitter coating, wreath making, snowflake cutting muscles. It’s important to ease into these things lest you pull something and have to sit out the rest of the season.

 
           D.I.Y. FIREPLACE         UGLY CHRISTMAS SWEATER

I’d love to see any projects you make following my tutorials or any projects you’ve made on your own!  

Merry Christmas Crafting season!!
4

Elf on the Shelf: Gender Reassignment Surgery

For as long as he can remember, Jingle Bop knew he was different.  While all the other elf boys were out playing reindeer games, little Jingle was in his Mom’s closet trying on her best Christmas Eve frocks.   While the other little elves were saving their elf allowance to buy their first sleighs, Jingle was saving his for a sewing machine.  Well, it’s all payed off because now Jingle Bop is the #1 Elfinware Designer in the whole North Pole and he’s just released his Holiday 2012 Collection exclusively on our site!

 Below we have a sweet red felt skirt with snowflake details and a lovely white waistband that, as you can see by the look on his face, Jingle is particularly proud of

and here Jingle is modeling a white felt mini with holly berry and jingle bell details.

We’re proud of you for being yourself Jingle.  You look fabulous- boy or girl!!

1

Getting Ready for Sadie: the Bedding

Getting the nursery ready for our upcoming bundle of squish has been really fun.  It’s still weird to think that I’m going to be the Mom and that this is all for my own daughter but as our due date approaches (Jan. 1st!) it’s becoming more and more real. 
Part of it feeling more real is that my Mom completed the crib set that she made for us for the baby shower and it came out cuter than I could have ever imagined!  We got the fabric from my friend Aurora’s store, Fabric Bliss, which is located in Denver but they have a very easy-to-navigate online shopping feature.  I emailed Aurora and told her that I was looking for something “dainty but not girly, that coordinates but doesn’t match, has a vintage feel and it can’t be pink!”  Immediately she wrote back and suggested the Seaside collection from October Afternoon.  

And it’s beyond perfect!!

All of the fabrics coordinate with each other but don’t necessarily “match”, the prints are dainty enough for a baby girl but not drowned in pink-on-pink and they have an adorably vintage feel that goes perfectly with the vintage feel we are going for in the nursery.  

My Mom also made this precious mermaid-tailed receiving blanket (her own design) and I can’t get enough of it!  Thanks Mom!!  You’re the greatest!

1

Stephanie’s Cake Fascinator

My beeeeautiful friend, and bride-to-be, Stephanie requested that I make her a piece-of-cake fascinator for her upcoming birthday/bachelorette party.

I started with a cardboard form, iced it with white paint, threw on some pearls and then basically submerged the whole thing in glitter.

The only thing more fabulous than this fascinator is the little lady it was made for- Stephanie I’m so incredibly happy for you and I can’t wait to see you in your weddin’ dress!!  Tim is a lucky man…but I bet you tell him that all the time.    **MUAH!!**

0

Why Don’t You Make Me?: Block Printed Valentine’s Card

This Valetine’s Day, spread some love (that won’t result in a rash) by making this handcarved, handprinted, hand-addressed, snail mailed Valetine for your Sweetie. 
For this project you will need:
  • pencil/eraser
  • a brayer (or a paint roller)
  • a scrap piece of cardboard
  • a spoon
  • cardstock or thin cardboard to print on
  • a stamp
To begin, draw your image directly onto the carving block using a pencil with a slightly rounded tip.  *If the tip is too sharp it will puncture the surface and not mark properly.*  If you’ve chosen to do words, keep in mind that you will need to write the words backwards onto your carving block.  Luckily for me, writing backwards is my secret super power. 

  (I’m the first to admit this is not a terribly useful super power but it’s the only one I’ve got so please try to act impressed.)

When you’re satisfied with your design, begin to carve out the area around your letters using your carving tool.

Continue to carve until you’re happy with your image. 

Next, prepare your brayer.  I don’t have a brayer so I used this small paint roller that I have.  Using some cardboard as your surface add some acrylic paint and roll it until your roller/brayer is evenly covered.

Then roll the paint onto your carved block until it is also evenly covered.

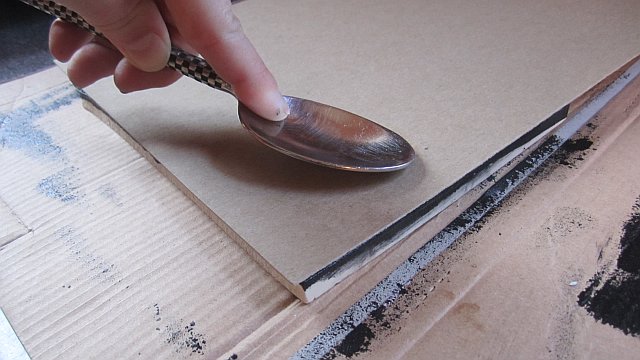
Now, rather than picking up your block and trying to set it down on your printing surface, bring your printing surface to your block.

Lay the paper down on top of the freshly inked surface and using the backside of a spoon, rub the back of the paper to burnish the image onto the paper.

 (Thanks for teaching me that trick (and word) Atara!)
Remove paper and there you have it!

For an added touch, add glue to the heart,

and coat in Glitter, obviously.

When the paint & glue is dried, turn over and address your post card to the lucky recipient of your choice, add a stamp (it may cost slightly more than a regular post-card stamp, check with the post office) and drop it in the mailbox. **
There is nothing more special that recieving something handmade from someone who loves you…except for recieving money maybe but I don’t know how to make that.
Happy Valentine’s Day!
**If you don’t have a Valentine my co-worker Zach said you can just send the card to him, because he’s a giver.

*     *     *     *     *     *     *     *     *     *     *     *     *     *     *     *     *     *

Inspiration for this project came from Jennifer’s amazing Christmas card:
Thanks Jennifer!
0

Gold Leafing A Vintage Frame

I tried my hand at gold leafing last night for the first time ever and I loved it.  It took this already beautiful- but dull- vintage ornate frame bought at Brimfield this past August and gave it a drag queen makeover. 

It’s so shiney!  And now so is my floor and my coffee table and my Mama Cat because she was “helping” me.  Seriously, this stuff gets EVERYWHERE.  It’s probably best to do it in a work room (don’t have one) or a garage (don’t have one of those either) or to go outside (brrrrrrr, no way!)  Livingroom it is!

It’s worth it though ’cause look how pretty:

I gave the original mat that came with the frame a mini makeover too. 
It’s pretty simple:
  1. Cover entire surface of mat with gluestick
  2. Lay decorative paper face down on flat surface
  3. Lay mat, glue side down, on top of decorative paper
  4. Smooth out any ridges/bubbles
  5. Trim along edges with X-acto knife
  6. Bob’s your uncle.

 I can’t show you the finished product because it’s part of a birthday present.  Pictures to follow.
Have you ever gold leafed?  Got any tips for me?  I’d love to hear them!
1

Why Don’t You Make Me: Frosty the SHATTERPROOF Snowglobe

Last week I was home in ‘Rado for First Christmas (because you should always have at least 2 Christmases) and got to have a craft day with my 4-year-old niece, who by coincidence just happens to be the coolest 4-year-old ever, Tabitha.  One of the projects we made was this Frosty the Snowman snowglobe. 
Since this was going to be Tabitha’s very own special (“it’s just my perfect size!” in her words) snowglobe I thought it should be a little more kid friendly than the original snowglobes so instead of an old glass jar we used a plastic peanut butter jar.  (Sister didn’t have an empty peanut butter jar lying around so we emptied the peanut butter that was in this jar into a Rubbermaid container and now it looks like she makes her own peanut butter.  “Oh this?  Ya, I make my own, so much healthier.”  So, we both win!)

For this project you will need:

  • a pre-schooler
  • an empty peanut butter jar (plastic)
  • a non-metal character of your choosing (ours is glass)
  • Glitter
  • distilled water
  • glycerin
  • modeling clay
  • glue gun (do I really need to list that every time?)
Begin by adding a generous dollop of hot glue (about the size of a silver dollar) to the inside of your washed and dryed lid to adhere the modeling clay to. 
Then squish modeling clay into the entire surface of the inside of the lid.  Little fingers come in very handy for this.  The clay should be about 1/2″ thick.
Now, press your character into the modeling clay.  Make sure to secure it in there pretty good, cover the feet up with some extra clay and then pose for a picture with it.
Oh what the heck, pose for 2 pictures with it- it’s Christmas after all!
Now it’s time to prepare your globe.  Fill your jar almost to the top with distilled water (it has to be distilled or it’ll be cloudy) and 1tsp of Glycerin.  (More detailed instructions here.) 
Then put the jar in a big bowl and let your pre-schooler add enough Glitter to choke a reindeer. 
**The bowl is just to catch all of the extra Glitter that is sure to go everywhere if you hand a jar of Glitter to a 4-year-old.**  Case in point.

 
(For the record, this is how much Glitter it takes to choke a reindeer.)
Now, screw on your lid.  This should be a little tough because some of the modeling clay will get into the threads of the jar.  That is a good thing because it helps to seal the lid onto the jar.  That is a bad thing because I have weak little noodle arms and almost had to ask for help to get my lid on.
**TIP: if you’re using an ornament like we did, be sure to remove the metal top because it will rust.  We also filled Frosty with water before submerging him so that there wouldn’t be extra air bubbles in our snowglobe.**
Next add a line of hot glue around the base of the lid and stick some garland to it. 

And you’re done! 
Now run up to your room and find the perfect place for it.  Tabitha did.  Then she immediately took it down, shook it up and Tim Tebow’d it across her room somehow.  I’m happy to report that Frosty passed this little quality control test with flying colors.  Toddler proof and proud!!

These snowglobes make wonderful last-minute gifts.  They’re super quick, inexpensive and made by hand so they’re extra special too.  Merry Christmas and happy crafting!

~mandee rae
0

The Art of the Ugly Christmas Sweater

As promised here is a quick tutorial on how to make the prettiest ugly Christmas sweater you ever saw and be the talk of the town to boot! 

What you’ll need:

  • old/second hand sweater (preferrably red or green)
  • glue gun (by now I feel like this should be a given)
  • mini pom poms
  • mini garland
  • mini Christmas tree decorations
  • mini jingle bells
  • 1 candy cane pipe cleaner
  • battery operated string of lights (very important)
  • Christmas music/hot chocolate/a dusting of snow on the ground

To begin:

Buy a sweater from a second-hand store, we got our’s at Goodwill for $3.99, a STEAL!

Have your model (aka Mom) put the sweater on and mark the center of it with a pom pom.

Then, using green garland we bought on sale for $.50 (Holler!!)

create the outline of a tree on your sweater keeping the top of the tree at least 2″ below the collar to allow room for a star.
**Tip: Place a piece of cardboard inside of the sweater to keep from hot gluing the sweater to itself.**
Hot glue the tree into place and decorate using any scraps of garland you have laying around, I used this small piece of leftover gold garland and also created my star with it. 

Then begin adding your mini Christmas tree decorations.

Now, from inside of your sweater add your lights.  Push the head of the bulb through the sweater and add a dollop of glue to hold it in place. 

**Lights are what really make ugly Christmas sweaters.**

Look at this BEFORE & AFTER.  The results speak for themselves here.

OPTIONAL:
Using a scrap piece of fabric, create a pocket to hold the battery pack and cover the cords inside of the sweater, this just makes it easier to wear.  Cut fabric, add some hot glue, press into place, dance of joy.

NOT OPTIONAL: add mini jingle bells to sleeves.

Using a scrap piece of cardboard inside of the sleeve to keep from gluing it shut, glue jingle bells about 1″ apart along the edge of each sleeve.  This ups your Ugly by at least 15% and makes your sweater a multi-sensory experience. 

Glue mini white pom poms ($.99 on sale, SAY WHAAAT?!) to the shoulders and arms of your sweater to simulate snow.

Flatten the arms of the sweater so that they are seam-side-down and add pom poms to the top of each sleeve.

Now, cut your pipe cleaner into 5 equal parts, about 1″ each and bend into the shape of a candy cane.  Glue into place….

…aaaaaaaand you’re done!!! 

Now all you have to do is flip on your lights and wait for the compliments to start rolling in.

…go ahead…why don’t you make me?
MERRY CHRISTMAS!!
0

Window Painting & the Scientific Method

New Christmas window I painted in Peabody, MA this morning.
Window painting is a cheap & easy way to decorate your house for Christmas without getting tangled up in extension cords or getting pine needles everywhere.  Plus it’s scientifically proven to provide you with 85% more “ooooo’s” and “aaaaaaah’s” than just decorating alone. 
Here, I’ll show you-
An average comment before window painting:
“that house looks nice.”

and an average comment after window painting:
“oh my sweet baby Jesus look at that house!!  it’s incredible!!  it’s so festive and beautiful and…oh my stars is that GLITTER on his nose?!?!”
See?  At least 85% more freak out every time!  It’s science. 
This window was contracted by Karyn McGovern who is a fellow crafter & Glitter enthusiast.  She made this uh-dorable Grinch bow below and sells them on her website RhinestoneObsessions.  Super the cutest.

Happy Friday!!

0

Up-cycled Catalog Trees: DELUXE EDITION

Yesterday I showed you how to make Up-cycled Catalog Christmas trees.  

Today, I’m going to show you how to take those regular trees (left)and make them DELUXE! (right).
**It should be noted here that in my country “deluxe” is a synonym for “has Glitter on it.”

Beginning at Step 4 from yesterday’s project with the catalog completely folded into standard tree form-
Next begin folding the bottom corners of each page up toward the spine of the catalog.

**Fold in about 2 inches, leaving enough space at the bottom of the catalog for the tree to form a base to stand on.**

Continue folding each page until you have something resembling this:
And finally, get out your Glitterin’ kit:
  • mod podge (or Elmer’s glue)
  • Glitter (Random Disco or otherwise)
  • a paintbrush
Put a thin layer of glue on the top of your tree.

Dump a mess of Glitter on there,
shake off the extra aaaaaand….
…you’re done! 
Now all you have to do is find the perfect place to display your creation.  Mine made a brief appearance on this shelf before settling in as the table centerpiece. 
Beautiful.  And more importantly easy!
***Sister thought it was important to mention here that you can also paint your trees.  Spray paint would be your best option but if you have a catalog tree made from non-shiney paper like the one below, a simple tempera paint would work just fine.***
Happy Crafting!