Recently my upstairs neighbor’s cat, Grits, decided to move out of the house. Seems their new baby has left her completely un-impressed. They tried time and again to get her back inside and a couple of times succeeded…only to have her insist on being let out again. So, we made her a nice little tent on the front stoop where she’s been living and taking her meals. (Occupy Somerville) We assumed she’d come in when Winter got here. No dice. So now, with the weather getting dangerously cold outside here in New England, today’s project could actually be a life saver. (I’ll be adding that to my resume` now of course: Mandee Rae- crafter, painter, conversationalist, life saver.)
I saw this project on animal lover’s Paul & Dru Mudsow’s website. It’s a simple shelter made from 2 Rubbermaid containers, here is my experience with it.
To start you’ll need:
- 1- 18 gallon storage bin ($6.99)
- 1- 10 gallong storage bin ($5.99)
- roll of silver bubble style home insulation ($15)
- outdoor electric heating pad ($35) (optional)
- glue gun
- heat gun or hair dryer
- exacto knife
- duct tape
- a sharpie
- hay (mine was leftover from a gardening project)
Total: $28 (assuming you have items 5-10 at home) / with heating pad: $63
Begin with 2 regular storage bins with lids,
one should fit comfortably inside the other.
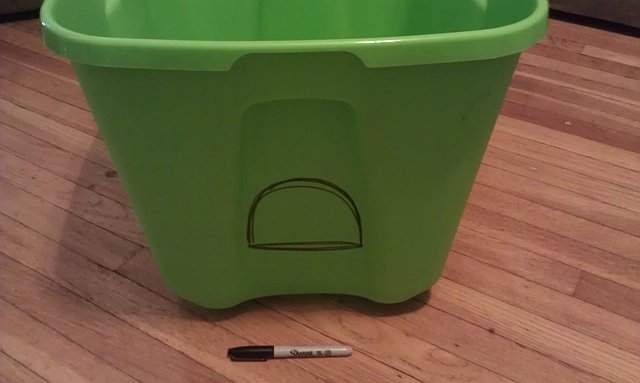
Draw a semi-circle big enough for your cat about 6″ up from the bottom of the outside bin. The hole needs to be high to keep the shelter from flooding.
Heat the area to be cut with a hair dryer. I used the heat gun I have from an
embossing project earlier in the year it worked beautifully.

When the area is heated up, cut around your line with an exacto knife or other sharp knife.
**Careful! The knife will slice through the plastic quickly now that it’s soft.**

Add about an inch of hay to the bottom of the outside bin to fill in any ridges the insulation might miss. Hay is an excellent natural insulator.
Next, cut a piece of insulation to fit the bottom of the bin leaving enough so that it curves up the sides and leaves no blank spaces.

I put about 4 layers of insulation on the floor to protect Grits from the cold ground.

Continue insulating until the entire bin is completely covered, leaving space for the door. I double insulated the outside box using my glue gun to keep it in place on the walls.

I also added a piece of insulation to the bottom of the smaller bin to fill an indentation so there is no place for cold air to hide.
Now place the smaller bin snugly into the insulated bin. If it’s not snug add more insulation and/or fill the empty spaces with hay.
 When you have your bins lined up where you want them, trace the hole onto the smaller bin and, using the same techniques as above, cut out the hole.
 The resulting space between the 2 bins needs to be sealed to protect Kitty from rough edges and to seal it from drafts.
I used duct tape.

And then, because it’s Christmas, I used some candy cane duct tape I had to make it seasonal. That part’s optional.
Now you’re ready to make Kitty’s bed. Lay down about 3 inches of hay in the bottom of the smaller bin for her to make a bed in. Never use towels for outside cats because they can get wet and freeze!! Hay doesn’t retain moisture like towels and cats will burrow into it making a nice warm bed.

I double insulated
both lids- heat rises, trap all available heat by having a well insulated roof.

Trace around the lids onto the bubble wrap. You can write on it with a sharpie.

Then cut them out about an inch smaller than the lid and hot glue them on.

Snap the first lid on to create a water tight seal and then add the larger lid.

After you’ve snapped both lids into place, add a strip of duct tape to the outside bin just to make sure the wind doesn’t blow the lid off. And you’re done!
The cat’s body heat will fill up the space and keep it warm all night. I plan to add a flap door after she is completely comfortable going in through her candy cane entrance. And now Ms. Grits will be warm, safe and dry all winter.
**TIP** I sprinkled some cat nip on the hay to get Ms. Grits to go in there originally. Now that she knows it’s safe and sound she goes in whenever she’s chilly.