0

It’s beginning to look a lot like Christmas…CRAFTING!

It snowed the other morning.

For me that means it’s Christmas time.

So even though it only snowed for 3 minutes and it was mixed with rain and none of it stuck to the ground…it still snowed. And now it’s Christmas time!!!

More specifically, it’s Christmas CRAFTING time!!  Here are some of my favorite Christmas crafts from years past to keep you busy while I stretch out my glitter coating, wreath making, snowflake cutting muscles. It’s important to ease into these things lest you pull something and have to sit out the rest of the season.

 
           D.I.Y. FIREPLACE         UGLY CHRISTMAS SWEATER

I’d love to see any projects you make following my tutorials or any projects you’ve made on your own!  

Merry Christmas Crafting season!!
4

Elf on the Shelf: Gender Reassignment Surgery

For as long as he can remember, Jingle Bop knew he was different.  While all the other elf boys were out playing reindeer games, little Jingle was in his Mom’s closet trying on her best Christmas Eve frocks.   While the other little elves were saving their elf allowance to buy their first sleighs, Jingle was saving his for a sewing machine.  Well, it’s all payed off because now Jingle Bop is the #1 Elfinware Designer in the whole North Pole and he’s just released his Holiday 2012 Collection exclusively on our site!

 Below we have a sweet red felt skirt with snowflake details and a lovely white waistband that, as you can see by the look on his face, Jingle is particularly proud of

and here Jingle is modeling a white felt mini with holly berry and jingle bell details.

We’re proud of you for being yourself Jingle.  You look fabulous- boy or girl!!

0

$5 DIY Googley-eyed Fall Wreath Tutorial

I’m not sure what’s happening to me but I felt an overwhelming urge to make an Autumn wreath this year.  I’ve always been into decorating, and over-decorating, for the holidays but I usually keep it to giant fake spiders, severed hands and glittery skeletons.  Your standard October stuff.  So when I found myself shopping for a wreath making supplies, nobody was more surprised than me.  It was as if I blacked out and woke up at the register with a wreath form and fake foliage in my hands. 
So, I’ve accepted it, I like wreaths.  There, I said it.  
But that doesn’t mean I have to make a button covered, gingham scarecrow country crafts with a giant bow type of wreath.   I can like wreaths and still make them look like me.  It doesn’t mean I have to buy high waisted Mom jeans or run out and lease a mini-van.  Not yet anyway.  
So here is my tutorial on how to make a quick $5 Googley-Eyed Fall Wreath:

SUPPLIES (I got the $1 supplies from the dollar store)
$1 wreath form
$1 fall foliage x3
$1 5pk mini squashes
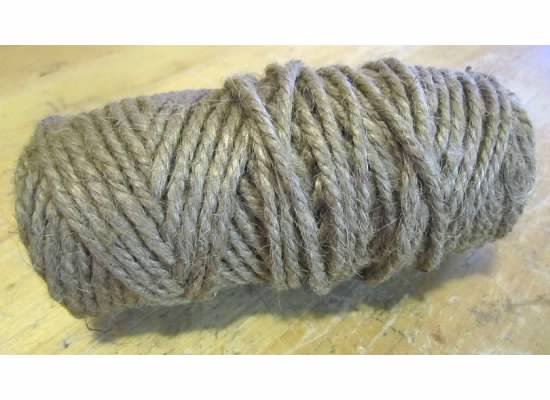
ball of twine (had on hand)
googley eyes (had on hand) 
wire cutters (had ’em)
glue gun/glue sticks (had ’em)

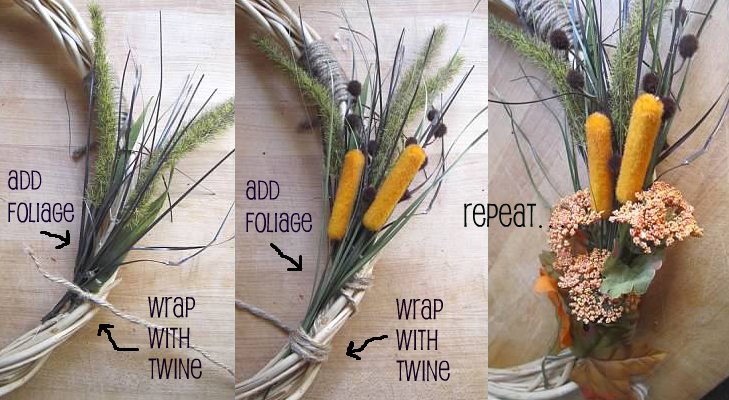
To begin, start by tying the end of your twine to your wreath form and wrap the twine around the wreath for a space about 3″ long.  This is purely decorative. 

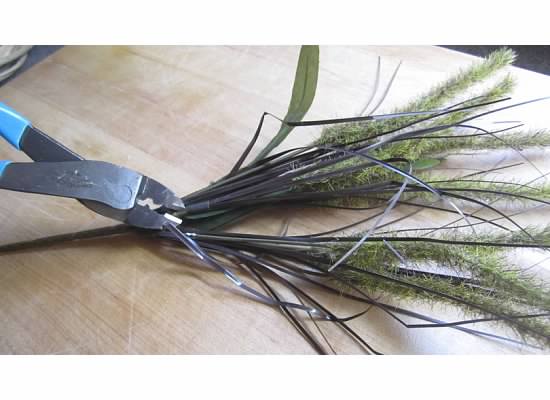
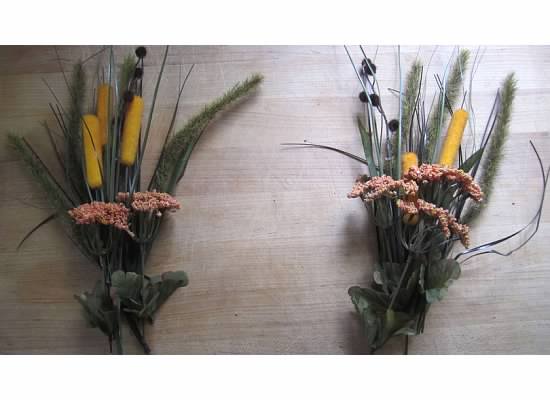
Next, arrange your 3 bouquets of fall foliage and begin snipping them off of the main branch with your wire cutters.  Arrange the new seperate pieces so that you have 2 equal bouquets (if you plan on making 2 wreaths…which I did because I have a double front door.)

Now begin adding the plastic foliage to your wreath just under the 3″ band of twine.  I used hot glue to keep the plants in place and then wrapped more twine around the base of each one- mostly because it looks cute but also to secure it in place.  

When you reach the end add another 3″ section of wrapped twine to finish it off.  You can stop here and have a perfectly lovely Autumnal Wreath to hang on your front door but I feel like it’s just too regular.  It needs something. 
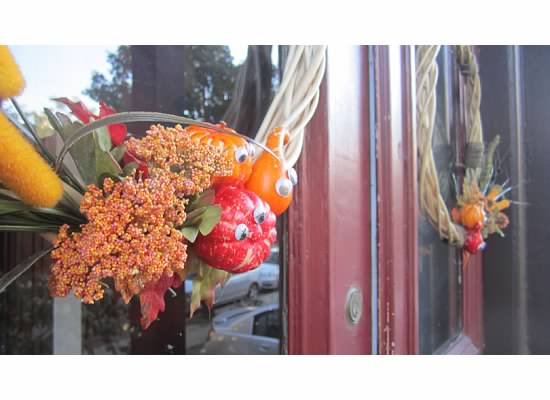
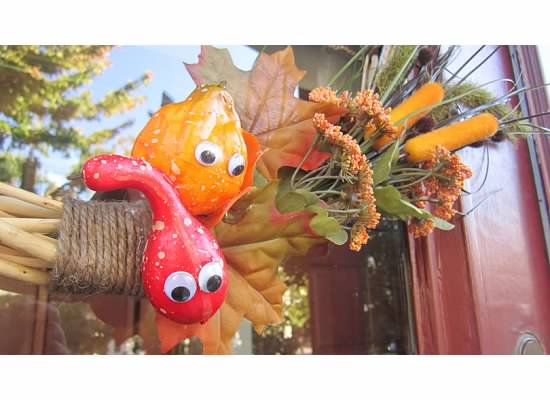
In my case, that “something” almost always ends up being googley-eyes.  Or “guurely eyes” as my niece calls them.  
From the 5 pack of mini squashes I scooped at the dollar store, I grabbed a couple of ’em and gave them life.  I am not unlike the good Dr. Frankenstein in this way.  

Take your freshly googelied squashes and arrange them at the base of your fallin’ foliage until you are satisfied and hot glue them into place.  

**Note: my squashes are made of styrofoam which means they basically melt when the come in contact with hot glue.  Turn your glue gun to the lowest setting if you have that option or put the glue on the wreath first and allow it to cool for about 3-4 seconds before placing your squash so that it doesn’t turn into a puddle.**

And finally, add a twine hanger to the top of your wreath and hang with pride from your front door(s).  

Together these wreaths cost me less than $10 and they can be left up through Halloween and all the way through to Thanksgiving.  I hope you like them as much as I do. 
happy fall!

1

A little more bacon-y, please.

 I feel like I’ve come to a good place in life when people know to come to me if they need something to look “more bacon-y”.  That was the request for this inexpensive bacon costume bought online by Karen- it just didn’t look bacon-y enough so she asked me to fix it.

And it’s a good thing because Maya and her pet sheep would have looked ridiculous in that store-bought bacon costume in the annual 4-H costume parade at the Marshfield Fair.  That was a close one!

p.s. please note Maya’s custom bacon bow…I think there’s a Lady Gaga costume in her future.

0

Kids Crafts: My Pet Rock

This is a fun and easy project to entertain kids on a hot Summer’s day and, depending on the supplies you have on hand, it could even be free.  
For this project you’ll need:
  • some rocks
  • spray primer (optional)
  • acrylic paint
  • googley eyes (never optional)
  • a couple of kid-friendly paintbrushes
  • tacky glue
  • some chil’ren

Start out by collecting some rocks.  
This comes as naturally as breathing to my 5-year-old niece so luckily after a day of adventurin’ I already had a pocketful of rocks to start with.  If you can’t find any “good” rocks, you can always buy some at a craft store.  
Next, using a spray primer lightly coat both sides of the rocks. 

This helps the paint to adhere to the rock’s surface and allows bright colors to show up better on darker colored rocks. 
Once the primer is dry (about a 1/2 hour on each side) put some aprons on some kids (some that you know preferrably), put out some paint and let them get creative.  

Encourage the kids to paint monsters with big mouths, stripes, polka dots, animals they like, flowers…anything that gets their imaginations going.  

 
If there are globs of paint on a rock, the googley eyes may be able to stick right to it.  If not just glue ’em on.

Acrylic paint is non-toxic and washable before it’s dry.    

And now, if your little people really love you, they might just give you one of the rocks they just painted.  I was lucky enough to have this rock gifted to me.  “She’s a girl on this side and a boy on the other”….obviously.

0

Giving in to Trends: Ombre Paint Chip Art

I spent a good portion of my teenage years rejecting all things trendy and popular.  That habit has stuck with me now into my late 20’s (ok, early 30’s) whenever I see something adorable on another craft blog and/or everybody’s favorite website, Pinterest.  (See, I’m even trying to pretend like I don’t totally love Pinterest.)  Instead of happily jumping on the bandwagon and admitting that something is adorable, I dog ear it and come back later, trying not to make eye contact with it and acting like it’s not so great. 
Today I decided that it was time for me to make eye contact with paint chip art and I’m glad I did because it was a fun and easy project (not to mention practically free!) that only took about an hour to finish.  
Here’s how I did it:
First, go to your favorite paint store and grab some paint chip samples from the big wall of colors (or use different colored construction paper).  I actually felt a little bad about taking so many so I asked the guy behind the counter if it was ok.  He shrugged with complete indifference and I was guilt-free.  

Next, find a small circular object to outline onto the paint chips to utilize as much of the colored area as possible- I used a small roll of tape- and cut out your circles.

Experiment with the layout of your circles until you have ’em just how you want ’em.

Prepare your frame– I got this white matted frame for $5.99 at the Christmas Tree Shop by my house- the frame has some dings in it but I’m writing them off as “shabby chic.”

Remove the mat and backing from the frame and outline the opening of the mat directly onto the cardboard backing.

Now, starting and the bottom and beginning with the lightest layer, glue the circles to the cardboard using a glue stick.  The second layer should overlap the first slightly and the circles should become progressively darker towards the top of the cardboard.

You only have to fill in the area inside of the outline we made but be sure to overlap the edges so that none of the backing shows.  
To add a letter, take another paint chip in a coordinating color and draw your letter backwards on the BACKSIDE of it.    

Cut out the letter, glue it into place wherever your little heart desires and presto- you’re an artist.

I decided to let some of the lettering from the names of the paint show on my final product.  It gives it extra home-made-i-ness.  
Now you have a personalized gift to give as a new baby or shower present and no-one has to know about the ridiculous internal struggle that it took to make it.   

Happy Friday!
0

POW! ZAP! BOOM! Super Hero Shoes!!

I made these custom kicks for my super hero loving 5-year-old niece, Tabitha, who is in a two man band with her Dad that she aptly named ‘Tabitha and the X-Men.’  Wolverine is second only to Daddy in her life, she even calls people (including her Mom) “Bub”, just like Wolverine, he’s her absolute favorite.  Her other great love in life is Wonder Woman, she is a little girl after all. 
She always looks for shoes with her favorite characters but “those shoes are for BOYS, Aunt Mandee”- that’s where I come in.   
Sister bought these white canvas mary janes at Target.  They’re perfect, just-girly-enough, simple and easy to draw on.  I decorated them using a combination of paint markers and acrylic paint.  The drawings are comletely water proof- they won’t run, drip or fade. 
And now Tabitha has her own custom, Wolverine & Wonder Woman girly super hero shoes.   What more could a girl ask for?

Do you have your own hard to shop for tot that needs some custom kicks?  Email me and let’s see what we can come up with. 

2

Super Mario Bros. the Cast

I had a small outpatient surgery last week to correct my DeQuervian Tenosynovitis.  When I woke up from surgery, I found a big cast on my arm.  It was unexpected but during the last week it’s turned into my favorite accessory.  I’ve had it hot pink, black, red, yellow, white with a “POW!” and now, my coup de grace, it’s Mario Brothers World 1-1.

The cast started out white and I covered it with Coflex which comes in a bunch of colors, I chose light blue and grass green.

Then I made the decals- tunnels, bricks, clouds, man eating tunnel flower- out of white fabric medical tape and started arranging them on my cast.

And now I have a cast that any 80’s baby could be proud of.

Save the Princess!!
0

Day 2: Craft Day!

It’s Saturday, aka craft day!  I decided to try my hand at the trash-to-trasure example from yesterday:


the recycled bottle cell phone charging station.

 For this project you’ll need the following supplies:

  • a bottle destined for the recycle bin
  • 1/4 yard of scrap fabric
  • mod podge
  • X-acto knife
  • sandpaper
  • outlet cover
  • sharpie
  • paintbrush
To create this charging station, cut your plastic bottle in half, you’re creating a small cup.
Cover this cup with your scrap fabric using your paintbrush and mod podge.  
On the back of the cup, add a long piece of fabric to attach to he outlet cover. (seen below)

 While that dries, cover the outlet cover with the same fabric.  Follow my tutorial here.

Once both pieces are dry, cut the fabric extension into 3 pieces and cut out the middle piece- you’ll be left with 2 strips on either side to adhere to the outlet cover.

Place the cover face down on a surface that is level with the cup and mod podge the pieces together, below.


Allow to dry, plug in your phone and you’re done!