0

Geometrical Block Printed Planter Makeover

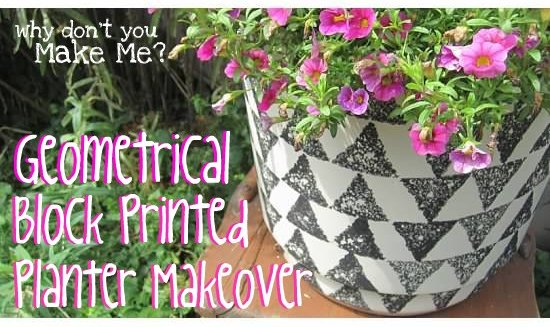
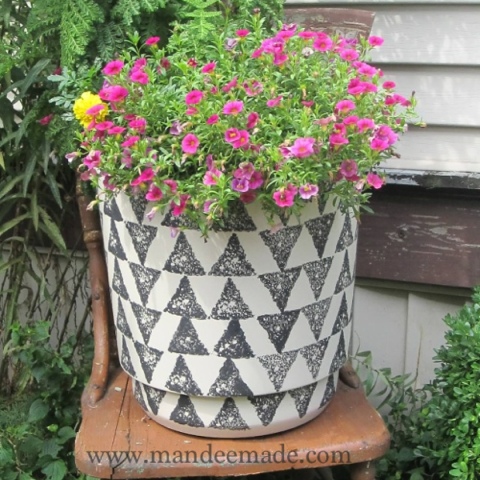
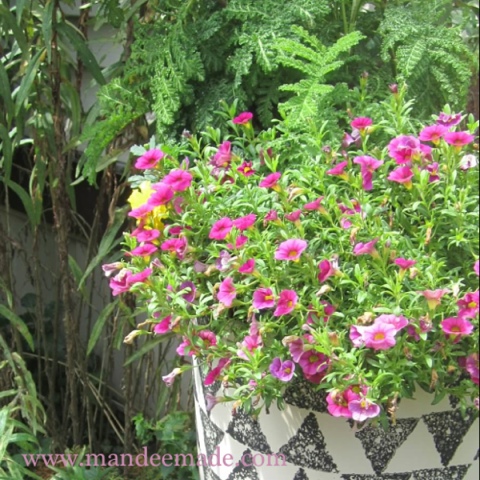
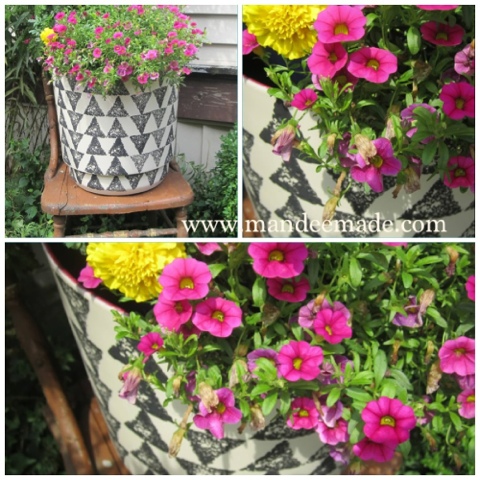
I made this beautiful block printed planter first thing this planting season and then forgot to share it.  This essentially means it never happened at all and all of my priming and painting and sponge cutting was for not.  So I’m posting it now, just in time for the end of planting season.  Luckily, I think it’s going to look just as lovely stuffed full of Mums and tall grasses as it looked chock full of petunias.  
And the best part of this project?  It  was completely free!

It was super easy (and free!) and would make a great weekend project.  
It took me about 4 hours start-to-finish including the time it took the paint to dry.  
Here’s how I made it…for FREE!  (Did I mention this project didn’t cost me anything?)
  1. I took an old banged up pot that wasn’t being used and gave it a good scrubbin’.
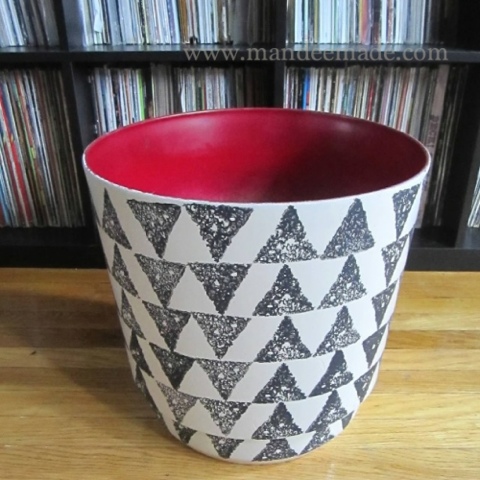
  2. Then I sprayed the inside of the pot red with some paint I had on-hand; spray the inside first because there may be some over-spray
  3. Then I primed the outside of the pot white and covered the over-spray
  4. After that I gave the whole thing a coat of Cream colored paint and let it dry.
Cost so far: $0.00
While the paint was drying I made the stamp.

  1. To make the stamp you’ll need an old sponge, scissors, a Sharpie & a ruler
  2. I used the ruler to measure out a 2″ x 2″ x 2″ triangle
  3. and drew it on the sponge with my marker
  4. Then I cut along the lines and now I have my stamp…and it’s still FREEEEE!
Now you should test your stamp to experiment with how much paint to use, 
how hard to press down on it and to decide on the pattern you’re going to use. 

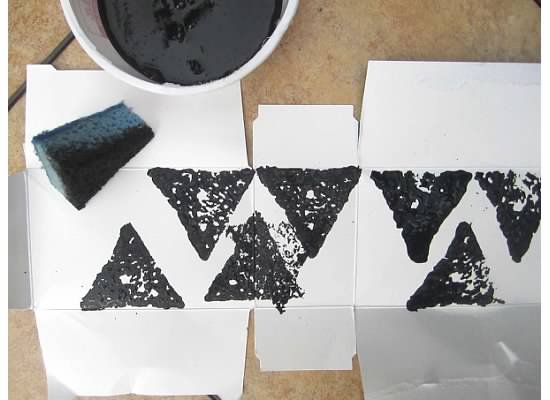
I used a piece of blue painter’s tape to create a line to follow while I stamped.  
This helped a little bit but it would be ok without it also.  
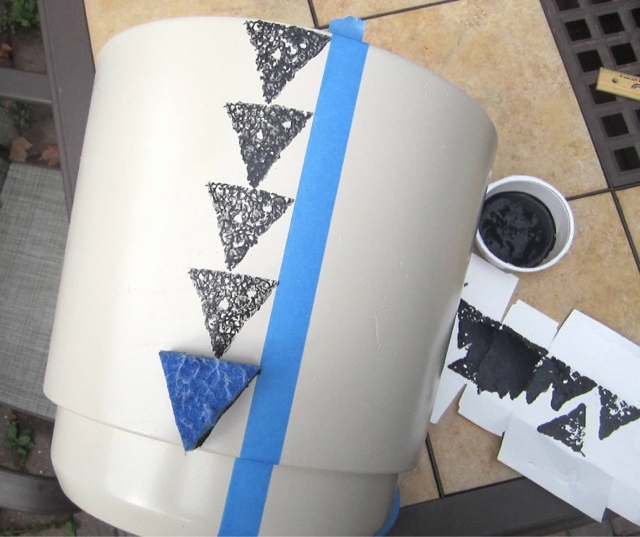
I continued to stamp all the way around the planter, 
moving my piece of tape to the next row as the paint dried.
Then I removed the tape and I had a perfectly printed, perfectly d.i.y.’d, 
perfectly FREE brand spankin’ new planter!  And, I can’t remember if
I told you this or not yet but it didn’t cost me a thing!!  
Rit Rooooo!!  (that’s a whistle noise)
I’d love to see your pictures if you decide to make one of your own. 
Thanks for stopping by.  Have a wonderful weekend!  
3

Dresser Makeover: Recreating a $799 dresser for $42

Recently I was approached to recreate a beautiful dresser with a staggering price tag.  The Collage Dresser retails for $799 and I’m sure it’s well worth it- the dresser is lovely- but “in this economy” (aka the catch phrase of the 21st century) who can really afford it?  The recipient also wanted a decidedly less “shabby chic” version of the dresser with no distressing or faux wear on the paper.

To make this dresser I started out with my basic supplies.  My client already had an old cheap dresser in her house so we saved money on having to buy one though you can always find cheap dressers on Craigslist if you were looking to do this project.   Cost of project: $0.00
I also had some semi-gloss, oil-based white paint left over from another project and used that to paint the dresser.  It’s a good idea to use a gloss or semi-gloss on dressers so that you can wipe them down if necessary.  I did 3 coats of the white with a roller.  So far the cost of this project is still $0.00.  Excellent.
I ordered some vintage wallpaper on Etsy from 2 shops, Vintage Sheet Addict and Threads & Memories, I spent about $16 at each shop and the paper is awesome.  There were so many cool designs it was really hard to decide which ones made the cut.  Cost of project now: $32.
I laid the paper out on the drawers and experimented with placement until it looked right. 
One drawer in particular gave me a considerable amount of trouble.   I got it right on the 3rd attempt. 
I glued the wallpaper in place using Tacky Glue and then smoothed it out using a brayer.  (You can find them both at Michael’s, AC Moore, Blick, etc.)  This worked better than Modge Podge because since this is vintage wallpaper that’s been rolled up for God knows how long- it didn’t lay as well as regular paper would and the corners kept curling up on me.  Because the Tacky Glue is true to it’s name and “tacky”, it was easier to make the edges stick to the drawer.   

Then I spent $10 on some basic black knobs from the Target General Super Store and my dresser was complete.  Bringing my grand total to $42 and some change.  Not bad considering this project was done as a trade- I got to spend a week at my client’s house on Cape Cod in exchange for creating this dresser for her.  I think I got the better end of this bargain.

Thanks for coming by!  I hope you liked my project.  If you did, let me know in the comments below and don’t forget to go “like” me on Facebook.   (I told my Mom I was popular…I don’t want to disappoint her.)

0

Parenting Project #1: Homemade Baby Wipes

In honor of today being the first day of Spring, I thought we could start our Spring Cleaning by focusing the most important object in the house: the baby.
And more specifically- her bottom. 
When my little Sadie Jean was a mere 1 week old she got the most hellacious diaper rash I’ve ever seen.  (**it should be noted here that I’ve probably only seen 3-4 diaper rashes in real life but still, it was BAD!)  So- I started asking around to my circle-of-Moms to find out what they use to cure them and more importantly- to prevent them and was handed down this awesome Do-It-Yourself Butt Wipe recipe from my friend Katherine, who’s the mother of twin boys, and I’m happy to report that Sadie is now 12 weeks old and has remained diaper rash free!  This is a big deal in my life.  (Thank you Katherine!!)
So, without further ado, I give you the…

KATHERINE’S RECIPE FOR A HAPPY BABY BUTT
  • 1 roll paper towel, cut in half
  • 2C water
  • 1/8C baby oil (that’s 2 Tbls)
  • a squirt of baby wash (just a dab’ll do ya)
  • 5 drops tea tree oil (a natural antibacterial)
  • a rubbermaid container with a lid
To make these wipes, first cut a roll of papertowels in half.   
(I use Viva because they feel the most like cloth)
Remove the inner cardboard tube and pull out the first square of papertowel.
Now mix your ingredients.  I put mine in a seperate jar and then dump them over the papertowels while already in the Rubbermaid but you can do whatever you want.  It’s your party. 

Swirl the ingredients gently to mix but don’t shake them up or it will get all foamy and not soak into the papertowels right. 


Put the half roll of papertowels into the Rubbermaid, pour the mixture of the entire roll and let sit for at least 15 minutes to get them completely wet and you’re done!  You’ve made your first batch of butt wipes.  These are not only a nice way to cut down on the amount of chemicals being used to clean little Juniors rear end but they’re also economical.  For this roll of 88 wipes the total price was $.98!!  You just can’t beat that!!

Hopefully these work for you as well as they’ve worked for us! 
Diaper rash free in one-three!!
0

OMG! OMG! OMG!I’m Featured on Ecka & Pecka!! (no big deal)

Hey dudes.  I got the best email this morning from a sweet little thing named Meream over and Ecka & Pecka telling me they featured one of my projects on their adorable blog!  Huzzah!

And this little boost could not have come at a better time as I am exactly 6 weeks into my maternity leave today and have been wondering how in the world I’m going to fit painting back into my new life of bottle washing and diaper-figuring-outer-ing.  

It’s amazing how such a little thing can help make a girl feel re-energized and ready to paint!  Thank you Meream- you dream boat!  


(Maybe I’ll even get the paintings I’ve been promising my very own daughter done now too….baby steps.)
2

trash to treasure: twine-wrapped planter

I accidentally broke my favorite purple pot (aka my only purple pot) and just couldn’t bear to throw it out.  I considered gluing it back together but some of the pieces shattered so there would be holes all over it and the dirt would fall out.  Then I considered smashing it into little pieces and making some sort of mosaic out of it but then I remembered that I don’t like mosaics.  (No offense if that’s your thing, it’s just not for me.)  I also thought about taking a bite out of it like the girls on that TV show but my heart’s just not in it.

The only thing left was to fix it and figure out a way to cover the crack and make it super adorable- and I did just that.

Here’s how:

For this project you will need the following items:

  • a broken pot (or lamp or decorative vase or a little trash can, etc)
  • twine
  • glue gun/glue sticks
  • epoxy

Start off by washing your broken pot in hot soapy water.  **Careful to not burn and/or cut yourself!!**  This will remove any oils or dirt from the pot and make the epoxy hold better.

Next, mix your epoxy and add a generous amount to the break in your pot.  You should wear gloves during this and work in a well ventilated area, this stuff is smelly.   Put your pieces back together.

**You can put globs of the epoxy on since the seam doesn’t need to be beautiful because we’ll be covering the whole thing with twine.   Smear the extra epoxy around with a toothpick after putting the pieces back together to make a water-tight seal.

Now let your epoxy dry.  Mine says it takes 7 minutes to set.  

 Now you’re ready to start wrapping your newly fixed pot in twine.  I turned my pot over and started from the bottom.

 Begin by gluing the end of the twine to your pot and start wrapping, gluing the twine to the pot as you go.  

 I put a dot of hot glue about every 3-5″ on the entire pot.  This string’s not going  anywhere!!

When you’re done wrapping, throw a plant in there and you now have a custom, hand-wrapped planter to wow your friends with.  I’d recommend keeping this pot inside as rain or snow will get the string wet and it could possibly get moldy and gross.  And we wouldn’t want that.    

Thanks for reading!
0

Commuter Crafts: 30-minute Wrapped Earrings


I have almost all of my best ideas while r-u-n-n-i-n-g out of the door to catch the bus to get to work.  (Usually at the exact moment I run out of time to actually do anything about it.)

Last week as I was throwing things in my bag in an effort to leave only 4 minutes after I was supposed to- it hit me, “I should make some custom earrings to wear with this outfit.”

Of course!  I’m 4 minutes late leaving to catch the bus that only comes once an hour, I ran out of time to make my lunch and already nixed that, my hair is a mess and I don’t think I brushed my teeth but of course- of course there’s time for custom earrings.  Why wouldn’t there be?

I grabbed some cheap silver hoops from my collection and embroidery floss from a friendship bracelet I was making for a friend and ran out the door to chase after my bus.

Once on the bus (I made it- with seconds to spare I might add) I set up my workspace on my lap and began to wrap the hoops with the embroidery floss.   I chose salmon, beige and black for my colors. 

Tie a knot with all 3 colors on the post side of your hoop (above) and begin wrapping the end of the string with your first color (below).  Keep the floss held taught while wrapping to keep it uniform.  

Switch colors and wrap with each color to create your design.

At the end, quadruple knot the floss, cut as close as possible and you’re done!

In about a half an hour you’ve made some new earrings that you can now wear into work and give the impression that you are a grown-up who wakes early, puts together perfectly matched outfits complete with earrings and who doesn’t leave the house cussing at your cat or wrestling with your jacket.    
(No-one has to know what really happened this morning.) 
0

Why don’t you make me?: Three-Tiered Terra Cotta Planter

With limited space in my small city yard every inch counts so each Spring I am faced with a decision: do I want pretty flowers or a functioning vegetable garden?  I envision myself having friends over for dinner and quickly running outside with my schears to an adorable, and lovingly attended to, little vegetable garden- I’d grab fresh herbs for the potatoes, pluck some peppers and lettuce for the salad and maybe bring in some grape tomatoes for my friends to snack on before dinner.  They just love that.  Then, after dinner we’d all get in my spaceship and go visit Unitron, the home of the last living unicorn.  In other words, it’s not going to happen.

What did happen however is this- a triple-decker half veggie/half flower tower of compromise.  I’m taking baby steps to becoming the world’s best hostess by growing only the greens to my future salads and I still have room for flowers! 

Here’s how I did it:

First, I invited Liz over who did everything.  (This was an important step because Liz is wicked good at this stuff and because I have a cast on my right arm up to my elbow right now.) 

Next, we took pots from the pot graveyard on the side of my house and selected 3 in decending sizes.  (These don’t have to match perfectly, as you can see.)

Pick a sunny spot in your garden to place the biggest pot- we nestled ours right into this Vinca Minor- and fill with soil until just below the top.

Add a small dowel or bamboo rod into the largest pot and thread themiddle pot onto it burying the pot about an inch into the soil of the largest pot.

Then trim the dowel until about 3-4″ is showing to be inserted into the smallest pot.

Now have Liz thread the smallest pot right over the dowel and press into the dirt on the lower level burying it slightly.  Great job Liz!

And finally, you are ready to plant your Garden of Compromise.  Liz and I decided on some green lettuce, purple lettuce, white & purple flowers, 2 small cascading plants and topped the whole thing off with a ponytail fern.

Now we truly can have our garden…and eat it too.

Thanks Liz!! ❤ ❤ ❤

0

HAPPY EARTH DAY!!

Today is Earth Day!!!

Find an Earth Day celebration near you!

Today is the final how-to on my 10 ways in 10 days challenge.  Thanks for following me along and I hope some of these ideas stick with you or you were reminded of an earth friendly activity you’ve grown away from.

Today’s project: Make a plant waterer, keep a bottle out of a landfill, feel good about it!  Those are the directions and the description!

Have a Wonderful Day!!!
0

Day 2: Craft Day!

It’s Saturday, aka craft day!  I decided to try my hand at the trash-to-trasure example from yesterday:


the recycled bottle cell phone charging station.

 For this project you’ll need the following supplies:

  • a bottle destined for the recycle bin
  • 1/4 yard of scrap fabric
  • mod podge
  • X-acto knife
  • sandpaper
  • outlet cover
  • sharpie
  • paintbrush
To create this charging station, cut your plastic bottle in half, you’re creating a small cup.
Cover this cup with your scrap fabric using your paintbrush and mod podge.  
On the back of the cup, add a long piece of fabric to attach to he outlet cover. (seen below)

 While that dries, cover the outlet cover with the same fabric.  Follow my tutorial here.

Once both pieces are dry, cut the fabric extension into 3 pieces and cut out the middle piece- you’ll be left with 2 strips on either side to adhere to the outlet cover.

Place the cover face down on a surface that is level with the cup and mod podge the pieces together, below.


Allow to dry, plug in your phone and you’re done!

1

Day 2: Recycled Crafts for Kids

Teaching kids at a young age what it means to reduce-reuse-and-recycle is always something taught in school but to really drive the point home, it’s important to incorporate those things into real life.  Here are a couple of great crafts to do with kids to show them ways to recycle bottles into something fun and  useful.  

Ages 9+: Ashley over at Make-It-&-Love-It made this awesome cell phone caddy out of a lotion bottle.  This craft would be great for older kids, especially those just getting their first cell phones or iPods.

Ages 5+: This awesome bowling set made by CreativeDish would be perfect for kids old enough to wield a glue gun and is a great way to keep 10 bottles out of a landfill!

Ages2+: And finally, check out this “lava lamp” made by Rainbows & Unicorns (great name by the way!) made with a plastic bottle, oil, water, food coloring and complete with sea creatures!  This is a wonderful project for little ones- also consider throwing in some glitter or sequins!

Happy Friday!!!