0

Toomey A Favor: Hand Painted Sign

My friend Danielle can’t draw.  I tell you this because, while she can’t physically draw anything herself, it doesn’t stop her from needing things drawn constantly.  Get Well signs, Birthday cards, kitchen placards…you name it.  And most of the time, when she needs one of these graduation/bar mitzvah/baby shower signs made she comes to me and says, “hey Mandee, do me a favor?” and after hearing that phrase over and over ad naseaum, she earned herself the nickname “Toomey a favor”.  (Her last name being, of course, Toomey…in case you didn’t get that.)
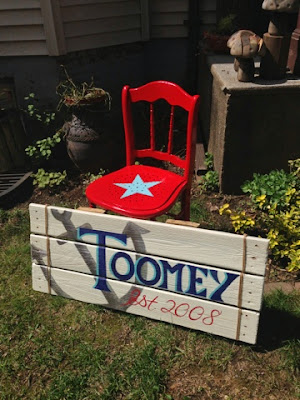
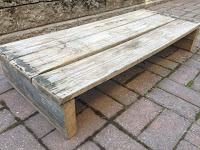
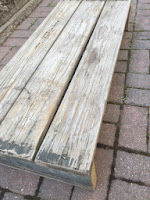
Her most recent request to “Toomey a Favor” was one of my favorite projects of the Summer so far.  Her family has a little lake house with a dock that needed replacing and when the old dock was torn up, Danielle, never one to miss out on a project, saved some of the weathered chunks of it and brought them to me.   And they are awesome!
  

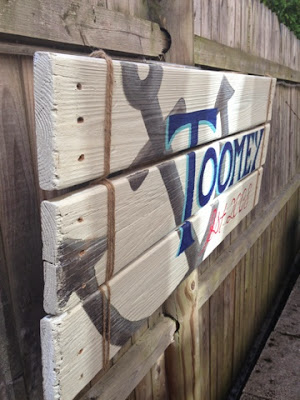
They are perfect and raw and full of stories never told.  I wanted to keep the integrity of the wood but make it more weather-resistant so I whitewashed the front planks and secured them together with some twine to add to the just-off-the-boat, nautical look of it.   Then I painted a gigantic anchor on it, symbolizing the Toomey family’s anchoring down and establishing roots, their name & wedding date and I’m really happy with the results. 


Now I just need to figure out the perfect thing to paint on my section of the dock.  Maybe something in a giant serpent lady with wings and an American flag halter top?  You know, something classy.  Ideas welcomed.  

0

I joined a sorority!

Ok, maybe I didn’t actually join a sorority BUT I did paint some FOUR FOOT TALL lawn letters for one!  The super nice ladies of Ioma Gamma Upsilon at U-Mass Amherst contacted me to customize their new letters and I couldn’t wait.  It’s probably the most unique (read: weirdest) request I’ve had to date so I was obviously all about it.
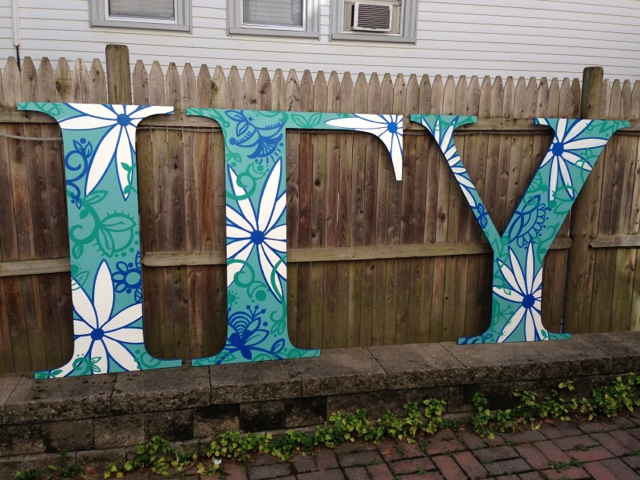
  
Ioma Gamma Upsilon’s colors are ultramarine & green and they wanted an all-over floral print on the letters.  I created a custom light teal color for the background and then did a simple white, blue & green design over the entire surface.   I also sealed the letters with a matte clear coat so that they wouldn’t have a glare during photo shoots but would be resistant to beer-bong mishaps.  (Or is that just in fraternities?  …Either way.)    
Now, before you tell me how great my all-over design is, because I can tell you’re dying to…I have a confession…this is actually my best-friend Liz’s design.  It’s what happens when she’s distracted and doodling.  These awesome little flowers and swirls just pour out of her pen…and then I snatch them up and make them life size on huge letters.  That’s what friends are for, right??  Thanks Liz!!

Sadie’s all ready to pledge.  Get this girl a paddle!

3

Dresser Makeover: Recreating a $799 dresser for $42

Recently I was approached to recreate a beautiful dresser with a staggering price tag.  The Collage Dresser retails for $799 and I’m sure it’s well worth it- the dresser is lovely- but “in this economy” (aka the catch phrase of the 21st century) who can really afford it?  The recipient also wanted a decidedly less “shabby chic” version of the dresser with no distressing or faux wear on the paper.

To make this dresser I started out with my basic supplies.  My client already had an old cheap dresser in her house so we saved money on having to buy one though you can always find cheap dressers on Craigslist if you were looking to do this project.   Cost of project: $0.00
I also had some semi-gloss, oil-based white paint left over from another project and used that to paint the dresser.  It’s a good idea to use a gloss or semi-gloss on dressers so that you can wipe them down if necessary.  I did 3 coats of the white with a roller.  So far the cost of this project is still $0.00.  Excellent.
I ordered some vintage wallpaper on Etsy from 2 shops, Vintage Sheet Addict and Threads & Memories, I spent about $16 at each shop and the paper is awesome.  There were so many cool designs it was really hard to decide which ones made the cut.  Cost of project now: $32.
I laid the paper out on the drawers and experimented with placement until it looked right. 
One drawer in particular gave me a considerable amount of trouble.   I got it right on the 3rd attempt. 
I glued the wallpaper in place using Tacky Glue and then smoothed it out using a brayer.  (You can find them both at Michael’s, AC Moore, Blick, etc.)  This worked better than Modge Podge because since this is vintage wallpaper that’s been rolled up for God knows how long- it didn’t lay as well as regular paper would and the corners kept curling up on me.  Because the Tacky Glue is true to it’s name and “tacky”, it was easier to make the edges stick to the drawer.   

Then I spent $10 on some basic black knobs from the Target General Super Store and my dresser was complete.  Bringing my grand total to $42 and some change.  Not bad considering this project was done as a trade- I got to spend a week at my client’s house on Cape Cod in exchange for creating this dresser for her.  I think I got the better end of this bargain.

Thanks for coming by!  I hope you liked my project.  If you did, let me know in the comments below and don’t forget to go “like” me on Facebook.   (I told my Mom I was popular…I don’t want to disappoint her.)

7

Makeover Monday: The Red Credenza

Makeover Monday (Tuesday Edition):
The Great Credenza Makeover of 2012
Last Thursday, on my daily trip around Craigslist, I found this beautiful 1960’s style credenza living in the garage of the nicest seller in the history of Craigslist for $25 bucks! 
The drawers and the sliding doors turned out to be the only real wood on it.  The rest of it, as far as I can tell, is made of cement mixed with whatever the heaviest thing on earth is.  Seriously, this thing weighs a ton.  Luckily my wonderful (and hilarious!) friend Zach was nice enough to throw on some sweat pants and go pick it up with me.  Thanks Zach!  (Sorry you had to wear sweat pants to class.)
We got it in the house as far as the living room where it had to stay because Zach had to go to class (in sweats) and, as I may have mentioned, this thing weighs at least 300lbs (and I can only bench press 275) so I can’t move it alone.  Living room it is.  I began to unscrew the legs…there were 7.  Interesting.  
While it was flipped over I realized that the entire thing was 3 separate pieces connected by 2 brackets and the common top.  I unscrewed the brackets and top, had it quickly inspected by Fonzie and the pieces came right apart.  I love it so much as one piece but at 8′ long I have nowhere the entire unit would even fit. 
Plus, now that they’re separate I can actually move the pieces all by my lonesome.  Holler!
I sanded everything- doors, drawers, legs, etc.
And primed them with Zinsser.  This was my first time using Zinsser and I love it!  It dried really fast and covered everything.
I painted the outer parts of the credenza (here after 1 coat) with Rustoleum ‘Gloss Sunrise Red’.  I chose the Rustoleum because I wanted a high shine and I loved this perfect color red.  The inside was painted flat ‘Olivewood’ grey.
Now for the doors.  I decided not to prime the doors, just sand them mostly because I didn’t want to tape around that little metal handle bit.  Also cause I just didn’t think they needed it. 
I put the doors in the credenza where they’ll eventually live and traced the line where they overlap.

Next I laid my doors on the amazing decorative paper I’m using to cover them and cut around their outline using an X-acto knife.  Using the line we drew on the second door I allowed for a little bit of overlap so that the image would appear as one piece when the doors are closed. 

Once you’re happy with your paper placement Mod Podge it into place.  Cover the entire surface with Mod Podge, lay your paper down and smooth out any air bubbles.  Be sure to work quick, this stuff dries fast.  When it’s in place, cover the entire surface with Mod Podge.  (It’s a good idea to use M.P. Hard Coat for this project.)

At first the glue will be cloudy but never fear, it will dry to a beautifully clear finish in no time.  I chose a matte finish and also decided to cover the second set of doors with a 2nd paper option because I just couldn’t pick one.
I put the top back on, screwed on the legs and slid the doors in and the results are a sophisticated yet playful piece of furniture that I absolutely adore.  I cannot wait to fill it with carp…I mean crap. 
***TIP from my Mom***
Instead of wasting time cleaning paintbrushes that you’re just going to use again for the second coat, wrap them in plastic wrap or a grocery bag and pop ’em in the freezer until you’re ready for the next coat of paint.  This way you only have to wash your brushes once at the end of the project which will help seriously reduce the desire to just abandon the project halfway through because washing paint rollers is such a gigantic paint in the a**.  Thanks Lady!
0

Easy Stool Makeover: Before and After

Stool: $4 at a garage sale
Can of spray paint: $3.95
Time: 10 minutes to sand/spray, 1 hour to dry
Result: adorable new red plant stand

To keep the natural character of this stool I chose to only lightly sand the varnish off before painting it.  This way, all of the wear-and-tear and naturally acquired flaws still show through after painting and you’re left with an adorable stool that looks like it’s  always been red.    
Total cost: under $8.  Not bad.  

**TIP** If you want to make this project extra easy, set the stool and the spray paint outside and tell Liz you’ll do it in a minute.  She can’t resist!

0

Gold Leafing A Vintage Frame

I tried my hand at gold leafing last night for the first time ever and I loved it.  It took this already beautiful- but dull- vintage ornate frame bought at Brimfield this past August and gave it a drag queen makeover. 

It’s so shiney!  And now so is my floor and my coffee table and my Mama Cat because she was “helping” me.  Seriously, this stuff gets EVERYWHERE.  It’s probably best to do it in a work room (don’t have one) or a garage (don’t have one of those either) or to go outside (brrrrrrr, no way!)  Livingroom it is!

It’s worth it though ’cause look how pretty:

I gave the original mat that came with the frame a mini makeover too. 
It’s pretty simple:
  1. Cover entire surface of mat with gluestick
  2. Lay decorative paper face down on flat surface
  3. Lay mat, glue side down, on top of decorative paper
  4. Smooth out any ridges/bubbles
  5. Trim along edges with X-acto knife
  6. Bob’s your uncle.

 I can’t show you the finished product because it’s part of a birthday present.  Pictures to follow.
Have you ever gold leafed?  Got any tips for me?  I’d love to hear them!
0

Green Eyed Inspiration

Recently my friend Mike (who doesn’t get a last name because he’s internet shy) came over to my house (wearing his tinfoil hat) and was all drooly and “holy crap I want that!” over my awesome card catalog that I told you about earlier this year.  And I don’t blame him, the thing is radical.  
He later told me that he was “so inspired” (read: wicked jealous) that he when he got home he immediatly went on Ebay to find one for himself.  And then, when he couldn’t find one (in your face Mike!) he settled on this  beautiful set of vintage Post Office Boxes instead (oh wait, in my face!)  
(like this one is available here)
Then, because he doesn’t waste all of his freetime re-pinning and tweeting, he built a case and a stand for it making his officially better than mine.  (I hope you’re happy Mike.)
Now he just has to figure out what could possibly be worthy of being stored in these little boxes.  Mail is too obvious and besides, he would never have enough.  I guess he could put his weed in there but that would sure be a lot of reefer. 
Oh, I know!  He can use it to keep his anti-internet, conspiracy theory zines in order (first alphabetically and then numerically) and away from the prying eyes of the gum’ment.  Perfect!

(<3 you Mike!)

0

Card Catalogin’

One day I said to my librarian Mother-in-Law,
“I’ve always wanted one of those old card catalogs libraries used to use.”  
To which she replied, “Really?  
We couldn’t pay peopleto take those things a couple of years ago.  
I bet we still have a couple in the basement of the library.”
And that’s how I got my very own card catalog.  HOLLER!!